Authentication (Identity verification)
Authentication is the process of proving you are who you say you are when accessing an application.
Session vs. Token-Based Authentication
Session-based authentication is a method where the server maintains a record of user session information, typically stored in server memory or a database, which is referenced using session IDs stored in the user's cookies. Token-based authentication, on the other hand, issues a token (often a JWT, or JSON Web Token) upon successful login, which the client then includes in the HTTP header for subsequent requests, allowing stateless verification of the user's identity without server-side session storage.
The main difference between token and traditional session-based authentication is that session-based authentication is stateful. The server stores the session ID and user info in memory or in a separate session cache, which can become complex as the system or number of users scale. Also, cookies often face challenges with Cross-Origin Resource Sharing (CORS) when APIs are served from different domains.
Token-based authentication is not always stateless, though. Many API tokens are still stored in a database table so they can be verified or revoked.
Here is a comparison table summarizing key differences:
| Feature | Session-Based | Token-Based |
|---|---|---|
| State | Stateful (server stores session) | Stateless (server does not store user session) |
| Storage | Server-side | Client-side (usually local storage) |
| Scalability | Lesser (due to server memory usage) | Better (no session data on server) |
| Portability | Cookies tied to a single domain | Tokens can be used across different domains and applications |
| Revocation | Sessions can be deleted server-side | Tokens are not easily revoked before expiry |
JWTs are a particularly popular flavor of token-based authentication because they save user data inside the token and can be validated without the database lookups mentioned above. This makes them well-suited for serverless and stateless applications. That said, being stateless is both an advantage in terms of scalability and a disadvantage the application cannot easily be revoked or invalidated on the server-side, introducing risk. (Because of this, they typically use shorter expiration times.) We'll explore JWT in the coming section.
JWT (JSON Web Tokens)
JWT, or JSON Web Tokens, is a compact, URL-safe means of representing claims to be transferred between two parties. The tokens are designed to be portable and can be used in various applications, such as authentication mechanisms and information exchange.
Structure of JWT
A JWT is composed of three parts, each separated by a dot (.). You can play around on jwt.io.
Header
The header typically contains two parts: the type of token, which is JWT, and the signing algorithm being used, such as HMAC SHA256 or RSA.
{
  "alg": "HS256",
  "typ": "JWT"
}
This JSON is then Base64Url encoded to form the first part of the JWT.
Payload
The second part of the token is the payload, which contains the claims. Claims are statements about an entity (typically, the user) and additional data. There are three types of claims: registered, public, and private claims.
- Registered claims: These are a set of predefined claims which are not mandatory but recommended to provide a set of useful, interoperable claims. Some of them are
iss(issuer),exp(expiration time),sub(subject), etc. - Public claims: These can be defined at will by those using JWTs. However, they should be collision-resistant (to avoid named clashes, they should be defined in the IANA JSON Web Token Registry or be defined as a URI that contains a collision-resistant namespace).
- Private claims: These are the custom claims used to share information between parties that agree on using them and are neither registered or public claims.
The payload is also Base64Url encoded to form the second part of the JWT.
Signature
To create the signature part you have to take the encoded header, the encoded payload, a secret, the algorithm specified in the header, and sign that.
For example if you are using the HMAC SHA256 algorithm, the signature will be created in the following way:
HMACSHA256(
  base64UrlEncode(header) + "." +
  base64UrlEncode(payload),
  secret)
This signature is used to verify the message wasn't changed along the way, and, in the case of tokens signed with a private key, it can also verify that the sender is who it says it is.
Decode a JWT
Decoding a JWT doesn't require any secret or key—simply splitting the token by the dots and then Base64 decoding the first two parts will give you the header and the payload. However, decoding is not the same as verifying. To verify the signature, you need the secret or the public key that was used to sign the token.
Here is the step-by-step process to decode the JWT:
- Split the JWT string into its three parts using the dot separator.
- Decode the Header and Payload from Base64Url to JSON.
- Optionally, you can verify the signature using the encoded Header and Payload and the secret or public key to ensure the token's integrity.
Note that while you can decode and examine the contents of a JWT without the secret, you must never trust the contents unless you verify the signature.
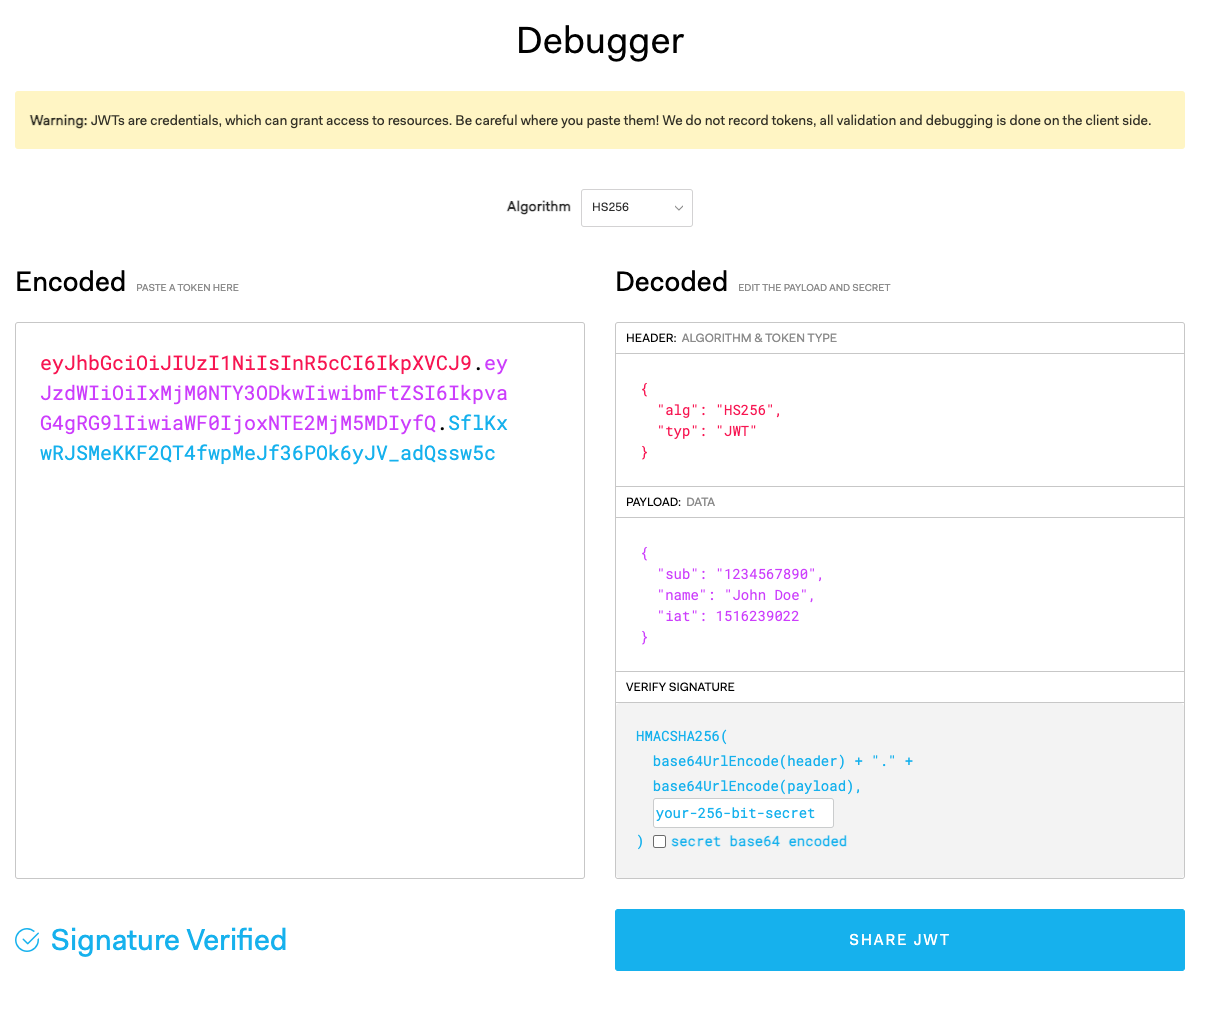
Example:
eyJhbGciOiJIUzI1NiIsInR5cCI6IkpXVCJ9.eyJzdWIiOiIxMjM0NTY3ODkwIiwibmFtZSI6IkpvaG4gRG9lIiwiaWF0IjoxNTE2MjM5MDIyfQ.SflKxwRJSMeKKF2QT4fwpMeJf36POk6yJV_adQssw5c
-
Splitting by
., we have three parts:eyJhbGciOiJIUzI1NiIsInR5cCI6IkpXVCJ9(Header)eyJzdWIiOiIxMjM0NTY3ODkwIiwibmFtZSI6IkpvaG4gRG9lIiwiaWF0IjoxNTE2MjM5MDIyfQ(Payload)SflKxwRJSMeKKF2QT4fwpMeJf36POk6yJV_adQssw5c(Signature)
-
Base64Url decode the two parts and you see the decoded JWT:
- Header:
{"alg":"HS256","typ":"JWT"} - Payload:
{"sub":"1234567890","name":"John Doe","iat":1516239022}
- Header:
Remember that without the secret, you cannot verify the authenticity of the JWT—you can only view its content.
SSO (Single Sign-On)
Below is a sequence diagram that demonstrates the implementation of JWT (JSON Web Token) for SSO (Single Sign-On). The diagram will represent the main entities involved in the SSO flow including the client, identity provider, SSO service and application server.
This diagram defines the steps followed during the SSO process using JWT between a client and an application server, with the identity provider responsible for authenticating the user and issuing the JWT. Here are the steps in the process:
- The client navigates to the SSO URL.
- The identity provider redirects the client to a login page.
- The user enters their login credentials.
- The identity provider sends the credentials to the SSO service.
- The SSO service generates a JWT upon successful validation.
- The client is redirected back to the destination application with the JWT included.
- The client accesses the application, presenting the JWT.
- The application server then validates the JWT with the SSO service.
- The SSO service returns the validation result.
- Depending on the JWT validation result, the client is either granted or denied access. If the JWT is invalid or expired, the client may be redirected back to the identity provider for re-authentication.