Testing
Why we need to test
Testing is essential to test the quantity of an application to meet both the functional requirements or non-functional requirements. Of course, we are able to test it manually but the problems are:
- It’s so time-consuming and easy to overlook bugs because of the human factor.
- When we deploy new features or bug-fixing release, we may introduce more bugs and things need to be retest again
That’s why we start to automate and write them. It gives us confidence that we made no mistake in the path of a use case and the automation speeds up the whole process. Both developers and QA engineers write tests. Anyway, we still need to do manual tests because not everything can be covered with automation, so we have also QA manual testers.
Types of Software Testing
Software Testing is a crucial phase of the software development cycle. There are many different types of software testing. Each of these testing types has its own purpose. The type of software testing that you choose depends on your testing objective, the complexity, and functionality of your software, and your testing team. The image below lists out some of the most common types of software testing used today.

Source: TatvaSoft - What are the Types of Software Testing?
Functional Testing
There must be something that defines what is acceptable behavior and what is not.
This is specified in a functional or requirement specification. It is a document that describes what a user is permitted to do so, that he can determine the conformance of the application or system to it. Additionally, sometimes this could also entail the actual business side scenarios to be validated.
Therefore, functionality testing can be carried out via two popular techniques:
- Testing based on Requirements: Contains all the functional specifications which form a basis for all the tests to be conducted.
- Testing based on Business scenarios: Contains the information about how the system will be perceived from a business process perspective.
Testing and Quality Assurance are a huge part of the SDLC process. As a tester, we need to be aware of all the types of testing even if we're not directly involved with them daily.
Non-Functional Testing
Non-Functional Testing is a type of testing used to evaluate a software application's performance, usability, dependability, and other non-functional characteristics. It is intended to test a system's readiness according to non-functional criteria that functional testing never considers.
Non Functional testing is essential for confirming the software's reliability and functionality. The Software Requirements Specification (SRS) serves as the basis for this software testing method, which enables quality assurance teams to check if the system complies with user requirements. Increasing the product's usability, effectiveness, maintainability, and portability is the goal of non-functional testing. It aids in lowering the manufacturing risk associated with the product's non-functional components.
There are lots of non-funational testing, to name a few well-known names - Performance testing, security testing, Reliablity testing, volumne testing, recoverying testing and visual testing. You may check the full list in browserstack
End to End Testing
End to end testing (E2E testing) is a software testing method that involves testing an application’s workflow from beginning to end. This method aims to replicate real user scenarios to validate the system for integration and data integrity.
Essentially, the test goes through every operation the application can perform to test how the application communicates with hardware, network connectivity, external dependencies, databases, and other applications. Usually, E2E testing is executed after functional and system testing is complete.
Naturally, detecting bugs in a complex workflow entails challenges. The two major ones are explained below:
- Creating workflows: To examine an app's workflow, test cases in an E2E test suite must be run in a particular sequence. This sequence must match the path of the end-user as they navigate through the app. Creating test suites to match this workflow can be taxing, especially since they usually involve creating and running thousands of tests.
- Accessing Test Environment: It is easy to test apps in dev environments. However, every application has to be tested in client or production environments. Chances are that prod environments are not always available for testing. Testers must install local agents and log into virtual machines even when they are. Testers must also prepare for and prevent issues like system updates that might interrupt test execution.
Functional Testing Types
Top 5 Functional Testing Types
| Testing Type | Description | Example Use Case | Common Tools |
|---|---|---|---|
| Unit Testing | Tests individual components or functions in isolation to ensure they work as expected. | Verifying that a calculateTotal() function correctly sums values. | JUnit, NUnit, pytest, Jest |
| Integration Testing | Tests the interaction between integrated components to identify issues in their interactions. | Checking that a user can log in and retrieve their profile from a database. | JUnit, TestNG, Mocha, Postman |
| System Testing | Validates the complete and integrated software system to check if it meets the specified requirements. | Testing the entire booking system of a flight reservation application. | Selenium, TestComplete, QTP |
| End-to-End (E2E) Testing | Verifies the entire application workflow from start to finish to ensure all components work together as expected. | Ensuring a user can search for a product, add it to the cart, and complete the purchase. | Cypress, Selenium, TestCafe |
| Acceptance Testing | Verifies the system against user requirements and business processes; often performed by end-users or stakeholders. | Ensuring the application meets business requirements before going live. | Cucumber, FitNesse, Manual Testing |
Acceptance Testing vs. E2E Testing
They are essential for validating that the application functions correctly according to specified requirements and workflows. Here’s a deeper look at their roles, importance, and manual implementation options.
| Aspect | Acceptance Testing | End-to-End (E2E) Testing |
|---|---|---|
| Purpose | Validates system against business requirements and user acceptance criteria. | Verifies Complete system workflows and integration points. |
| Stakeholders | End users, business analysts, or clients. | Testers or developers. |
| Scope | High-level business requirements. | Comprehensive user workflows. |
| Typical Questions Addressed | Does the system meet user needs and business objectives? | Does the entire workflow function correctly from start to end? |
| Execution | Can be manual or automated. | Can be manual or automated. |
| Example | Verify a new feature adheres to business rules. | Verify the process of ordering a product online works as expected. |
- Since we can implemente UAT and E2E manually, which one is harder to be automated?
- Both acceptance testing and E2E testing have their own complexities when implemented in code, but generally, E2E testing is harder to automate due to its broader scope and complexity.
- Why is UAT necessary if E2E testing covers the entire software system?
- While E2E testing ensures that all components of the software function together, UAT specifically validates if the software aligns with end-user requirements and expectations, providing a final check from the user’s perspective.
- How do UAT and E2E testing differ in their testing environments?
- User Acceptance Testing (UAT) typically occurs in a controlled environment that closely mirrors production and focuses on validating business requirements with end-users, while End-to-End (E2E) testing is performed in a comprehensive test environment to validate complete workflows, including system integrations and dependencies. ::: |
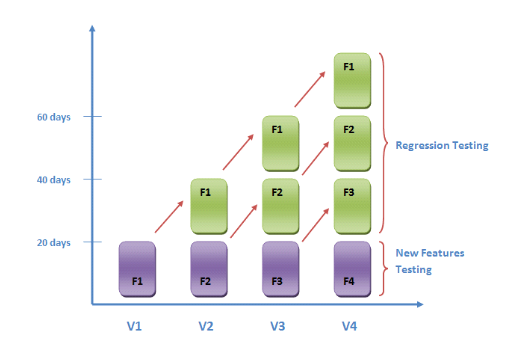
Regression Test
Regression testing is considered a software testing practice, not a specific testing type. It involves re-testing to confirm that recent changes haven't introduced new defects in previously working functionalities.
Source: Regression testing
Regression testing verifies that recent code changes haven't adversely affected existing functionality. It involves re-running tests on the modified software to ensure stability and correctness of the system. This testing detects unintended side effects from bug fixes, enhancements, or new features. Automated regression tests are often integrated into CI/CD pipelines for efficiency. By ensuring that new updates do not break existing features, regression testing helps maintain software quality and reliability throughout the development lifecycle.
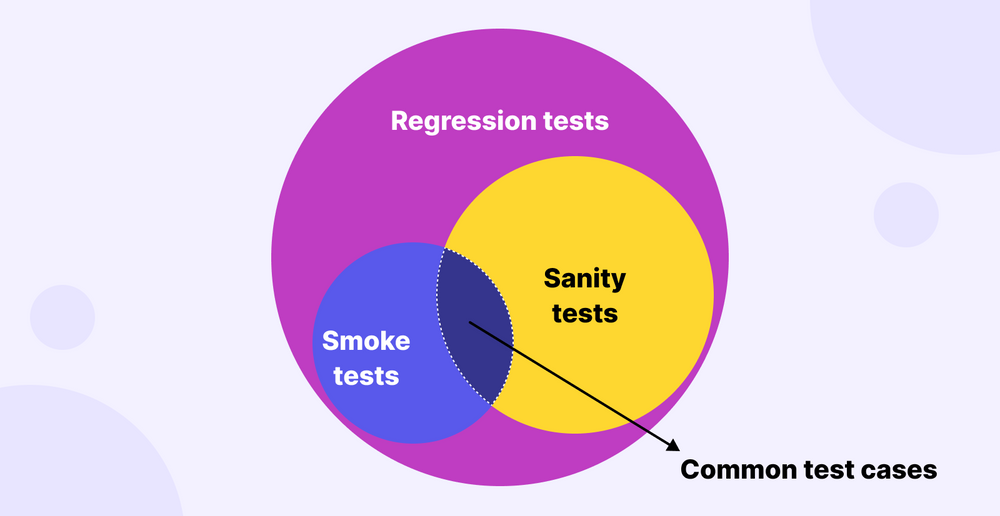
Smoke Testing and Sanity Testing
Smoke testing and sanity testing are both relevant and commonly used in * mobile app build testing * , as they help ensure the stability and functionality of the app at different stages of the development process.
After each mobile app updates, the app must undergo smoke testing and sanity testing to validate its functionality. Although the definition of sanity testing vs smoke testing is quite similar, they should not be used interchangeably.
A good distinction between sanity testing vs smoke testing is the depth of the testing objectives. Sanity testing is about making sure that the core functions of the app works fine after a code change, while smoke testing verifies that the app works at its bare minimum or not. Smoke testing has a narrower scope than sanity testing.

Source: guru99 - Sanity Testing Vs. Smoke Testing – Difference Between Them
Smoke Test Example: Verify that the mobile app launches successfully, the user can log in using default credentials, and the main dashboard loads correctly. This involves checking that critical functions like navigation between primary screens, basic user interactions, and essential features (e.g., viewing a list of items) are operational. If these tests pass, the build is considered stable for further testing.
Sanity Test Example: After fixing a bug in the user profile update feature, run tests to ensure users can now update their profiles correctly, the changes are reflected immediately, and no new issues arise in the profile management area. This focuses only on the updated functionality to confirm the fix works.
Regression testing is a software testing practice rather than a testing in itself. It contains multiple types of tests, with sanity tests being a checkpoint in the process to decide if the build can proceed with the next level of testing.
Basically, sanity testing works just as regression testing but deals with a smaller test suite. This subset contains critical test cases that are run first before the examination of the whole package of regression tests.
Reference: Katalon - Sanity Testing vs Smoke Testing: In-depth Comparison
How to know what to test?
Here is a comprehensive guide on determining what to test in software development, emphasizing practical and efficient testing strategies. The article covers key concepts, strategies, and practical examples to help developers focus their testing efforts effectively.
I found Charlie Roberts' video on "Testing Software and Systems at Amazon" particularly insightful, especially his analogy that effective testing is akin to asking the right questions.
Other interesting topic like mutation tseting in unit test and the topic of validating the local data representative to the real life situation.
Key Points
- Practical Testing Pyramid: Aligns with the traditional testing pyramid but emphasizes a practical approach tailored to your application's needs.
- End-to-End (E2E) Tests: Focus on high confidence tests that run through the entire system.
- Integration Tests: Verify the interaction between different parts of the system.
- Unit Tests: Test individual functions or components in isolation.
- Code Coverage vs. Use Case Coverage:
- Code Coverage: Measures how much of your code is executed by tests. It's a useful metric but not the ultimate goal.
- Use Case Coverage: Focuses on covering the real user scenarios and workflows that the application must support. This is more aligned with user needs and ensures meaningful testing.
- How to Decide What to Test:
- Identify Critical Paths: Focus on the most crucial user interactions and workflows in your application.
- Test the Happy Path First: Start with scenarios where everything goes right to ensure the basic functionality works.
- Consider Edge Cases: Once the happy path is covered, think about less common scenarios or potential failure points.
- Use Realistic Data: Tests should use data that reflects actual usage to be meaningful and effective.
- Automated Testing Strategies:
- Write Tests that Add Value: Focus on tests that provide meaningful feedback and confidence, rather than achieving high code coverage for its own sake.
- Maintainable Tests: Tests should be easy to understand, maintain, and adapt to changes in the codebase.
- Test in the Right Place: Ensure tests are located at the appropriate level of the testing pyramid to balance speed and confidence.
- Testing Tools and Techniques:
- Static Analysis Tools: Use tools like ESLint and Prettier to catch potential issues early.
- Linting and Formatting: Ensure code consistency and catch errors before they become problematic.
- Continuous Integration (CI): Integrate tests into your CI pipeline to catch issues early in the development process.
Code Coverage vs. Use Case Coverage
| Aspect | Code Coverage | Use Case Coverage |
|---|---|---|
| Definition | Measures the percentage of code executed by tests | Measures how well tests cover actual user scenarios |
| Focus | Lines, branches, and functions | Real-world user interactions and workflows |
| Advantages | Identifies untested code | Ensures meaningful, user-focused testing |
| Disadvantages | May miss real user issues | Harder to measure quantitatively |
| Best Practice | Use as a metric, not a goal | Focus on critical paths and user experience |
Test Coverage in Unit Testing
Test coverage in unit testing measures the extent to which the source code of an application is tested by a particular set of tests. It quantifies how much of your code is exercised by unit tests, helping to identify untested parts of a codebase. Here’s an overview:
Types of Test Coverage
- Statement/Line Coverage
- Definition: Measures the percentage of executable statements that have been executed by the tests.
- Formula:
(Number of executed statements / Total number of statements) * 100 - Example: In a function with 10 executable lines of code, if 8 lines are executed by the tests, the statement coverage is 80%.
- Branch Coverage
- Definition: Measures the percentage of branches (if-else conditions) that have been executed by the tests.
- Formula:
(Number of executed branches / Total number of branches) * 100 - Example: If a function has 5 decision points and tests execute 4 of them, the branch coverage is 80%.
- Condition Coverage
- Definition: Measures the percentage of boolean expressions evaluated to both true and false.
- Formula:
(Number of executed conditions / Total number of conditions) * 100 - Example: In an if-statement
if (a && b), condition coverage checks if bothaandbhave been evaluated as true and false.
Example in Python
Here’s a function that calculates discounts based on different conditions:
def calculate_discount(price, customer_type):
    discount = 0
    if customer_type == "regular":
        if price > 100:
            discount = 10
        elif price > 50:
            discount = 5
    elif customer_type == "vip":
        if price > 200:
            discount = 20
        elif price > 100:
            discount = 15
        else:
            discount = 5
    return price - (price * discount / 100)
Here are test cases that do not fully cover all statements, branches, and conditions:
def test_calculate_discount():
    assert calculate_discount(150, "regular") == 135.0  # Tests regular customer, price > 100
    assert calculate_discount(70, "regular") == 66.5    # Tests regular customer, price > 50 but <= 100
    assert calculate_discount(50, "vip") == 47.5        # Tests vip customer, price <= 100
    # Commented out tests:
    # assert calculate_discount(250, "vip") == 200.0   # Would test vip customer, price > 200
    # assert calculate_discount(120, "vip") == 102.0   # Would test vip customer, price > 100 but <= 200
Test Coverage Analysis��
- Statement Coverage:
- Statements covered: 7 out of 10 executable statements (3 return statements plus 7 inside conditionals).
- Coverage: 70% (7/10 statements executed)
- Branch Coverage:
- Branches covered: 4 out of 6 branches in decision points.
- Tested:
if customer_type == "regular"if price > 100elif price > 50elseinvipbranch for price <= 100
- Not tested:
elif price > 100invipif price > 200invip
- Tested:
- Coverage: 67% (4/6 branches executed)
- Branches covered: 4 out of 6 branches in decision points.
- Condition Coverage:
- Conditions covered: 3 out of 4 conditions tested for both true and false outcomes.
- Tested:
customer_type == "regular": True and Falseprice > 100for "regular": True and Falseprice <= 100for "vip": True and False
- Not fully tested:
price > 200invipbranch only partially tested (commented out test).
- Tested:
- Coverage: 75% (3/4 conditions evaluated both ways)
- Conditions covered: 3 out of 4 conditions tested for both true and false outcomes.
Testing Examples
End-to-end test with jest-puppeteer
Reference: Jest - Using with puppeteer
- Jest is a test runner. It doesn't care what type of tests you run, and you can use it for any type of tests.
- Jest is a JavaScript testing framework designed to ensure correctness of any JavaScript codebase. It allows you to write tests with an approachable, familiar and feature-rich API that gives you results quickly.
- Puppeteer framework offers Headless Browser Testing for Google Chrome. It allows the tester to perform the actions on the Chrome browser using commands in JavaScript. It provides a high-level API for controlling headless Chrome through Chrome DevTools Protocol. This DevTools Protocol offers tools to instrument, debug, inspect, and profile the Chromium or Chrome browsers.
- Jest Puppeteer provides all required configuration to run your tests using Puppeteer.
Headless Browsers play a major role in CI/CD, as these web browsers provide automated control of the web page without any graphical user interface (GUI). This allows the tester to perform automation testing on the web application using a command-line interface without testing the whole site by performing actions through the GUI.
Headless Browser Testing speeds up the QA process, which is required in CI/CD, where quick feedback is required to ensure the high performance of the application. It generates faster results even with a high volume of test cases, with due consistency and accuracy, which helps save time and resources.
- Zero config: "Jest aims to work out of the box, config free, on most JavaScript projects." This means you can simply install Jest as a dependency for your project, and with no or minimal adjustments, you can start writing your first test.
- Isolated: Isolation is a very important property when running tests. It ensures that different tests don't influence each other's results. For Jest, tests are executed in parallel, each running in their own process. This means they can't interfere with other tests, and Jest acts as the orchestrator that collects the results from all the test processes.
- Snapshots: Snapshots are a key feature for front-end testing because they allow you to verify the integrity of large objects. This means you don't have to write large tests full of assertions to check if every property is present on an object and has the right type. You can simply create a snapshot and Jest will do the magic. Later, we'll discuss in detail how snapshot testing works.
- Rich API: Jest is known for having a rich API offering a lot of specific assertion types for very specific needs. Besides that, its great documentation should help you get started quickly.
- First, install
jest-puppeteer
- npm
- Yarn
npm install --save-dev jest-puppeteer
- Specify preset in your Jest configuration:
{ "preset": "jest-puppeteer"}
- Write your test
describe('Google', () => {
  beforeAll(async () => {
    await page.goto('https://google.com');
  });

  it('should be titled "Google"', async () => {
    await expect(page.title()).resolves.toMatch('Google');
  });

  it('should load without error', async () => {
      let text = await page.evaluate(() => document.body.textContent);
      expect(text).toContain('google');
  });

  it('should contain a Google Search and Lucky button', async () => {
      await expect(page).toMatchElement('input[name="btnK"][value="Google Search"]');
      await expect(page).toMatchElement(`input[name="btnI"][value="I'm Feeling Lucky"]`);
  });

  it('should have app with link and sign in button', async () => {
    const app_btn = await expect(page).toMatchElement('.gb_D.gb_sc');
    let text = await page.evaluate(element => element.href, app_btn);
    expect(text).toBe('https://www.google.com.sg/intl/en/about/products?tab=wh');

    const sign_btn = await expect(page).toMatchElement('#gb_70');
    text = await page.evaluate(element => element.innerHTML, sign_btn);
    expect(text).toBe('Sign in');
  });
});
- Checking the result
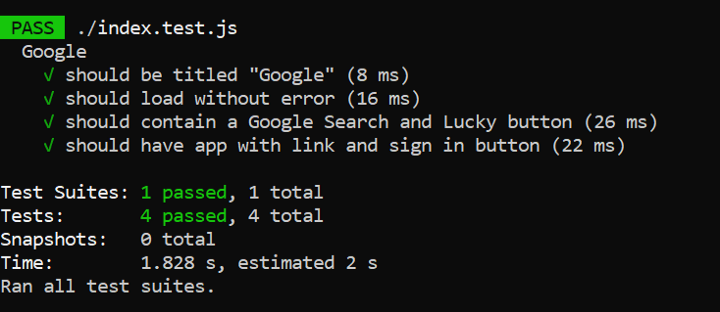
There's no need to load any dependencies. Puppeteer's page and browser classes will automatically be exposed
See documentation.
API Testing With Jest And SuperTest
Full tutorial: Building A Scalable API Testing Framework With Jest And SuperTest
- SuperTest is a node library, superagent driven, to extensively test Restful web services. It hits the HTTP server to send requests (GET, POST, PATCH, PUT, DELETE ) and fetch response
- testSequencer: to invoke testSequencer.js in the workspace to customize the order of running our test files
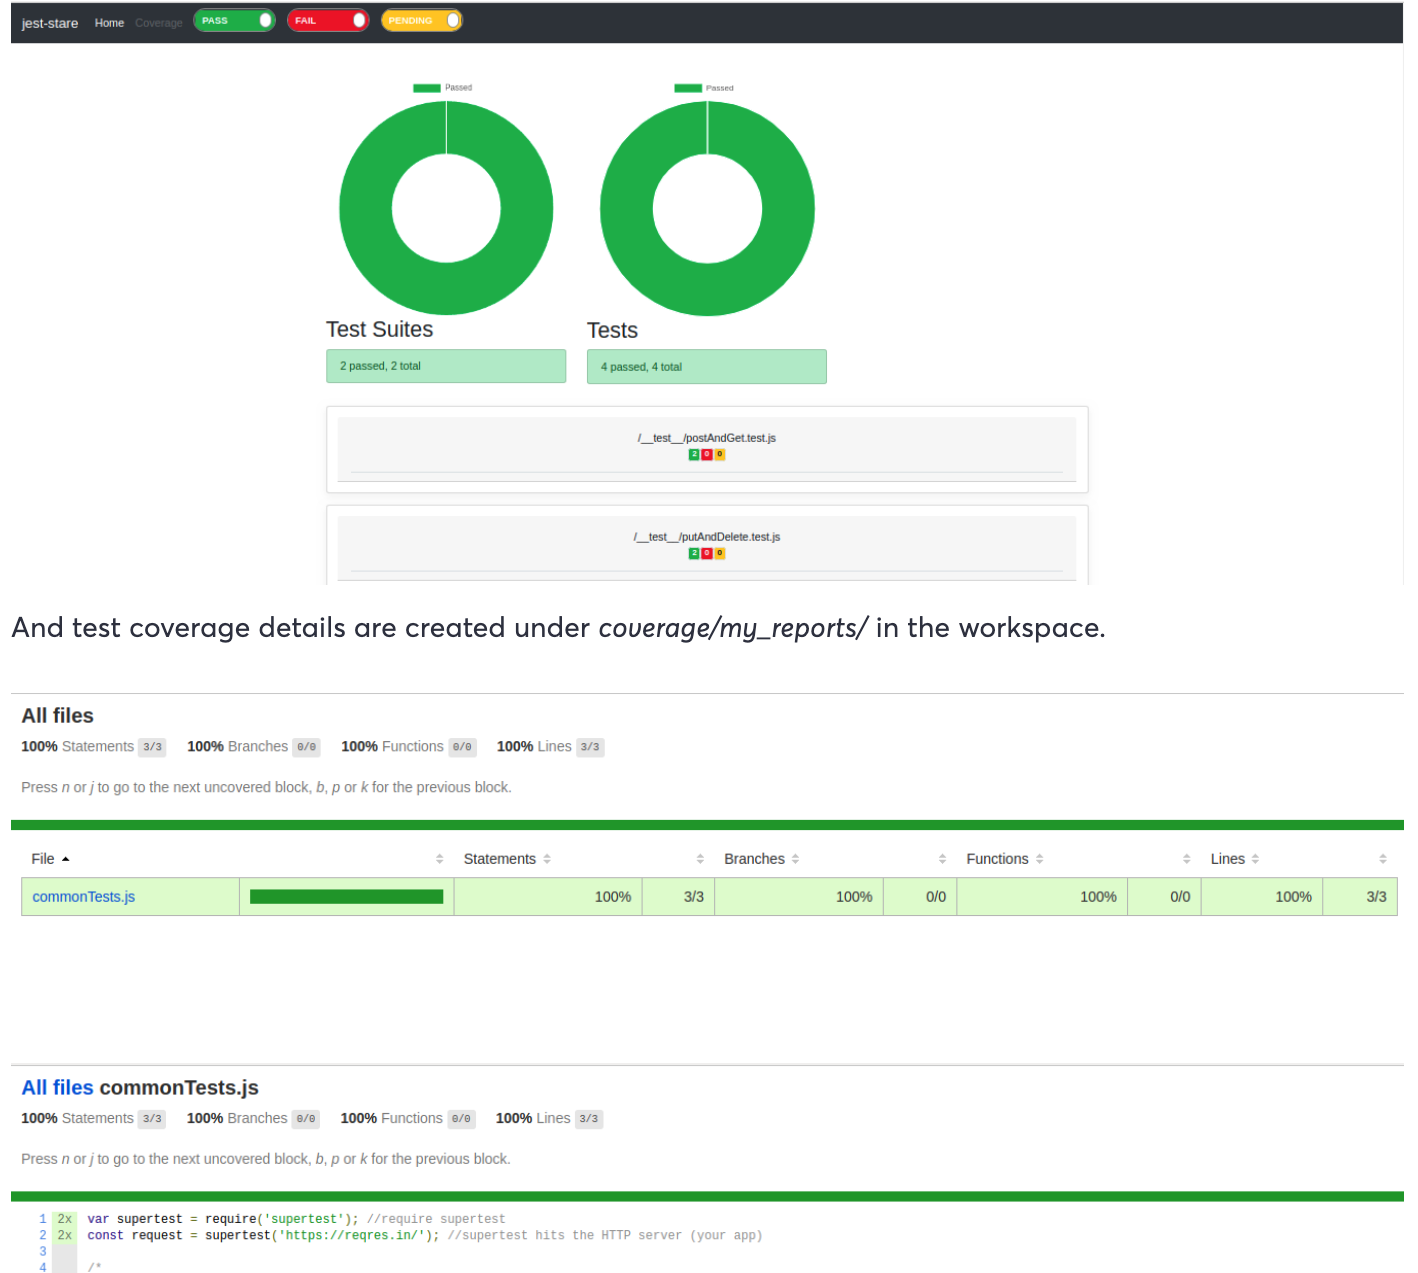
- jest-stare for generating custom test reports
// testSequencer.js
const Sequencer = require('@jest/test-sequencer').default;

class CustomSequencer extends Sequencer {
  sort(tests) {
    // Test structure information
    // https://github.com/facebook/jest/blob/6b8b1404a1d9254e7d5d90a8934087a9c9899dab/packages/jest-runner/src/types.ts#L17-L21
    const copyTests = Array.from(tests);
    return copyTests.sort((testA, testB) => (testA.path > testB.path ? 1 : -1));
  }
}

module.exports = CustomSequencer;
// package.json
{
  "name": "supertestjest",
  "version": "1.0.0",
  "description": "",
  "main": "index.js",
  "jest": {
    "verbose": true,
    "testSequencer": "/home/abc/jest-supertest/testSequencer.js",
    "coverageDirectory": "/home/abc/jest-supertest/coverage/my_reports/",
    "coverageReporters": ["html","text"],
    "coverageThreshold": {
      "global": {
        "branches": 100,
        "functions": 100,
        "lines": 100,
        "statements": 100
      }
    }
  },
  "scripts": {
    "test": "NODE_TLS_REJECT_UNAUTHORIZED=0 jest --reporters default jest-stare --coverage --detectOpenHandles --runInBand --testTimeout=60000",
    "test:watch": "jest --verbose --watchAll"
  },
  "author": "",
  "license": "ISC",
  "devDependencies": {
    "jest": "^25.5.4",
    "jest-serial-runner": "^1.1.0",
    "jest-stare": "^2.0.1",
    "supertest": "^4.0.2"
  }
}
// commonTests.js - SuperTest wrapper to store authorization token
var supertest = require('supertest'); //require supertest
const request = supertest('https://reqres.in/'); //supertest hits the HTTP server (your app)

/*
This piece of code is for getting the authorization token after login to your app.
const token;
test("Login to the application", function(){
    return request.post(``).then((response)=>{
        token = response.body.token  //to save the login token for further requests
    })
});
*/

module.exports =
{
    request
        //, token     -- export if token is generated
}
/* postAndGet.test.js
- POST requests to api/users endpoint, calls supertest.post()
- GET requests to api/users endpoint, calls supertest.get()
- uses file system to write globals and read those across all the tests
- validates response returned on hitting the HTTP endpoints
*/
const request = require('../commonTests');
const fs = require('fs');
let userID;

//Create a new user
describe("POST request", () => {

  try{
        let userDetails;
        beforeEach(function () {
            console.log("Input user details!")
            userDetails = {
                "name": "morpheus",
                "job": "leader"
            }; //new user details to be created
        });

        afterEach(function () {
            console.log("User is created with ID : ", userID)
        });

        it("Create user data", async done => {

            return request.request.post(`api/users`) //post() of supertest
                //.set('Authorization', `Token $  {request.token}`) //Authorization token
                .send(userDetails) //Request header
                .expect(201) //response to be 201
                .then((res) => {
                    expect(res.body).toBeDefined(); //test if response body is defined
                    //expect(res.body.status).toBe("success")
                    userID = res.body.id;
                    let jsonContent = JSON.stringify({userId: res.body.id}); // create a json
                    fs.writeFile("data.json", jsonContent, 'utf8', function (err) //write user id into global json file to be used
                    {
                        if (err) {
                            return console.log(err);
                        }
                        console.log("POST response body : ", res.body)
                        done();
                    });
                })
            })
    }catch(err){
        console.log("Exception : ", err)
    }
});

//GET all users
describe("GET all user details", () => {

  try{
      beforeEach(function () {
        console.log("GET all users details ")
    });

      afterEach(function () {
        console.log("All users' details are retrieved")
    });

      test("GET user output", async done =>{
        await request.request.get(`api/users`) //get() of supertest
                                //.set('Authorization', `Token ${request.token}`)
                                .expect(200).then((response) =>{
                                console.log("GET RESPONSE : ", response.body);
                                done();
                    })
      })
    }
  catch(err){
    console.log("Exception : ", err)
    }
});
/* putAndDelete.test.js
- calls data.json into ‘data’ alias which was created by the file system in our previous test to write global variables into it
- PUT sto api/users/${data.userId} endpoint, calls supertest.put()
- DELETE requests to api/users/${data.userId} endpoint, calls supertest.delete()
- validates response returned by the endpoints
- removes data.json (similar to unsetting global variables) after all the tests are done
*/

const request = require('../commonTests');
const fs = require('fs'); //file system
const data = require('../data.json'); //data.json containing the global variables

//Update user data
describe("PUT user details", () => {

    try{
        let newDetails;
        beforeEach(function () {
            console.log("Input updated user's details");
            newDetails = {
                "name": "morpheus",
                "job": "zion resident"
            }; // details to be updated

        });
        afterEach(function () {
            console.log("user details are updated");
        });

        test("Update user now", async done =>{

            console.log("User to be updated : ", data.userId)

            const response = await request.request.put(`api/users/${data.userId}`).send(newDetails) //call put() of supertest
                                //.set('Authorization', `Token ${request.token}`)
                                        .expect(200)
            expect(response.body.updatedAt).toBeDefined();
            console.log("UPDATED RESPONSE : ", response.body);
            done();
    })
  }
    catch(err){
        console.log("ERROR : ", err)
    }
});

//DELETE the user
describe("DELETE user details", () =>{
    try{
        beforeAll(function (){
            console.log("To delete user : ", data.userId)
        });

        test("Delete request", async done =>{
            const response = await request.request.delete(`api/users/${data.userId}`) //invoke delete() of supertest
                                        .expect(204)
            console.log("DELETE RESPONSE : ", response.body);
            done();
        });

        afterAll(function (){
            console.log("user is deleted!!")
            fs.unlinkSync('data.json'); //remove data.json after all tests are run
        });
    }

    catch(err){
        console.log("EXCEPTION : ", err);
    }
});
Test results HTML report is also generated as index.html under *jest-stare/ *
Snapshot testing with Jest
Snapshot testing is based on history of your previous tests. When you first run a snapshot test it creates a text file including the textual render of your component tree.
You need to keep these snapshot files in your VCS (git). When you make a change you can run these tests to see if it yet matches the snapshot text file or not.
// add.js
function add(a, b) {
  return a + b;
}

module.exports = add;
// add.test.js
const add = require('./add');

test('add function adds two numbers correctly', () => {
  expect(add(2, 3)).toMatchSnapshot();
});
In this example, we have a simple add function that adds two numbers. The test case uses Jest's toMatchSnapshot matcher to compare the result of add(2, 3) against the reference snapshot.
When you run the test using Jest, it will automatically create a snapshot file with the output of add(2, 3) if it doesn't exist. On subsequent test runs, Jest compares the current output against the saved snapshot. If the output matches the snapshot, the test passes. If there are differences, Jest displays a diff of the changes for review.
Snapshot testing with Jest helps ensure that the output of a function or component remains consistent over time, making it easier to catch unexpected changes or regressions in your code.
References
- AWS
- How to Create Test Cases for Automated tests?
- What is Automated Functional Testing: Types, Benefits & Tools
- How to run UI Automation Testing using Puppeteer
Tools for Unit test in javascript
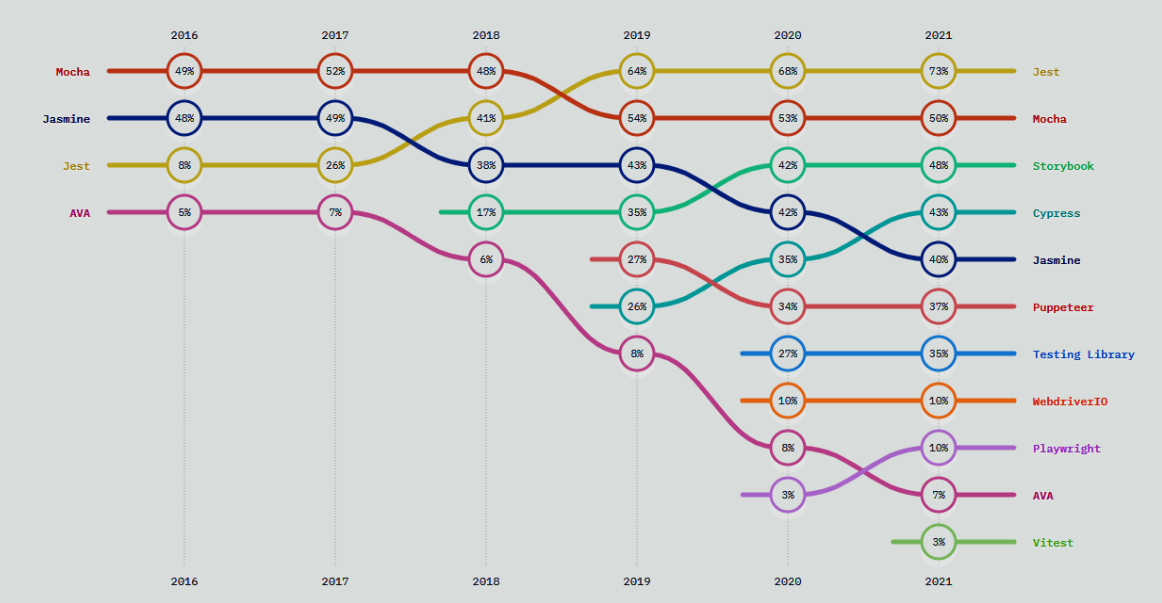
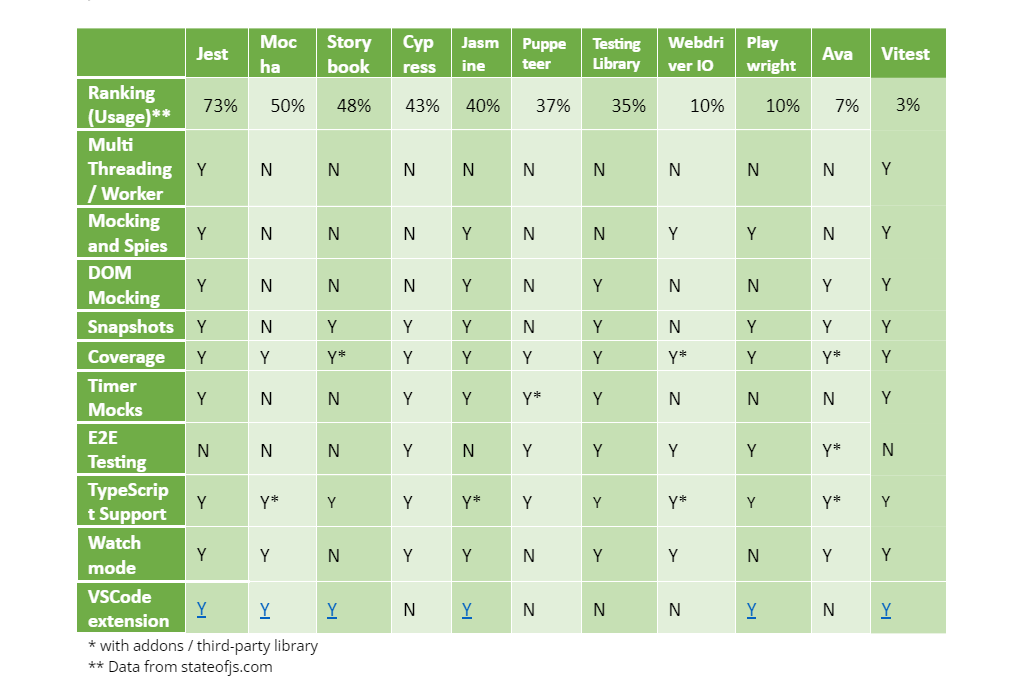
Source: Javascript unit test frameworks