Bootup Sequence
Press the power button on your system and after few moments you may see the Linux login prompt. Have you ever wondered what happens behind the scenes from the time you press the power button until the Linux login prompt appears. The Booting process starts when the system/machine power is switched “On”.
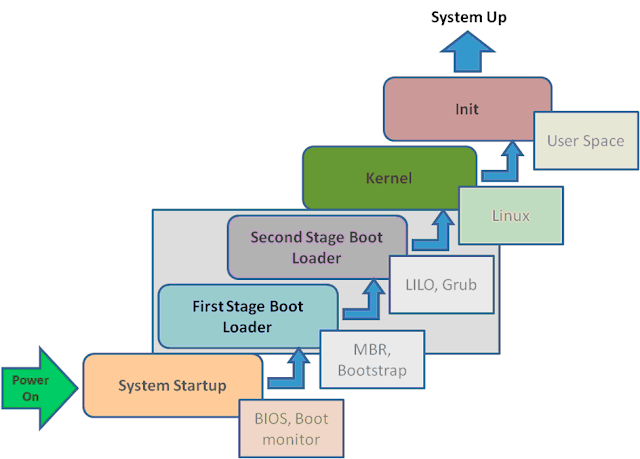
Source: Linux Boot Sequence
Stage-1 BIOS
The processor will execute the codes contained in BIOS [Basic Input and Output System]. The BIOS is actually a program stored in ROM [Read Only Memory]. The processor runs the instruction located at the memory location CS:IP FFFF:0000 of the BIOS, which is located at the 0xFFFF0 address. This memory location is close to the end of the 1MB of system memory accessible in real mode. It typically contains a jump instruction that transfers execution to the location of the BIOS start-up program. The BIOS will next run POST [power on self test] to find certain hardware and its working at the basic level. It compares the hardware settings in the CMOS [Complementary Metal Oxide Semiconductor] to what is physically on the system. It then initializes the hardware devices. Once the POST is completed, the processor jumps to a specific, predefined location in RAM. The instructions located here are relatively simple and basically tell the hardware to go look for a boot device.
Stage-2 MBR

Source: Linux Boot Sequence
MBR stands for Master Boot Record. It is located in the 1st sector of the bootable disk. Typically /dev/hda or /dev/sda, MBR is less than 512 bytes in size. This has three components:-
- primary boot loader info in 1st 446 bytes.
- partition table info in next 64 bytes.
- mbr validation check in last 2 bytes.
It contains information about GRUB (or LILO in old systems). So, in simple terms MBR loads and executes the GRUB boot loader. When a boot device is found (let’s assume that it’s a hard disk), the hardware is told to go to the 0th (first) sector (cylinder 0, head 0, sector 0), then load and execute the instructions there. This is the master boot record, or MBR . So, in simple terms BIOS loads and executes the MBR boot loader.
Stage-3 Grub
LILO or GRUB allows the root user to set up the boot process as menu-driven or command-line, and permits the user to choose from amongst several boot options. It also allows for a default boot option after a configurable timeout, and current versions are designed to allow booting from broken Level 1 (mirrored) RAID arrays. It has the ability to create a highly configurable, “GUI-fied” boot menu, or a simple, text-only, command-line prompt.
Due to the very small amount of data the BIOS can access, most boot loaders load in two stages. In the first stage of the boot, the BIOS loads a part of the boot loader known as the initial program loader, or IPL. The IPL interrogates the partition table and subsequently is able to load data wherever it may exist on the various media. This action is used initially to locate the second stage boot loader, which holds the remainder of the loader.
The second stage boot loader is the real meat of the boot loader; many consider it the only real part of the boot loader. This contains the more disk-intensive parts of the loader, such as user interfaces and kernel loaders. These user interfaces can range from a simple command line to the all-singing, all-dancing GUIs.
GRUB stands for GRand Unified Bootloader.
If you have multiple kernel images installed on your system, you can choose which one to be executed. GRUB displays a splash screen, waits for few seconds, if you don’t enter anything, it loads the default kernel image as specified in the grub configuration file. GRUB has the knowledge of the filesystem (the older Linux loader LILO didn’t understand filesystem). Grub configuration file is /boot/grub/grub.conf (/etc/grub.conf is a link to this). The following is sample grub.conf of CentOS.
#boot=/dev/sda default=0 timeout=5 splashimage=(hd0,0)/boot/grub/splash.xpm.gz hiddenmenu title CentOS (2.6.18-194.el5PAE) root (hd0,0) kernel /boot/vmlinuz-2.6.18-194.el5PAE ro root=LABEL=/ initrd /boot/initrd-2.6.18-194.el5PAE.img
As you notice from the above info, it contains kernel and initrd image. So, in simple terms GRUB just loads and executes Kernel and initrd images. Depending on the kernel boot option chosen or set as default, lilo or grub will load that kernel.
等我們在 grub 的選單中選擇了 Linux 這個系統,然後主機跑到 Linux 所在的硬碟之下,就開始將他的核心載入囉。在 Linux 的系統下,通常開機的核心都擺在 /boot 底下,因此,這個時候的 boot loader 就會到 /boot 去尋找相關的核心。我們的 kernel 名稱通常就是 /boot/vmlinuz-xxxx 的格式,目前 Mandrake 9.0 的核心版本為 2.4.19,而 Mandrake 自行釋出的版本為 2.4.19-16mdk ,所以,使用 uname –r 會出現 2.4.19-16mdk 呦!然後 MDK 9.0 預設核心檔案就是: /boot/vmlinuz-2.4.19-16mdk 這一個!好了,載入這個檔案再往下繼續吧!
Stage-4 Kernel
When the kernel is loaded, it immediately initializes and configures the computer’s memory and configures the various hardware attached to the system, including all processors, I/O subsystems, and storage devices. It then looks for the compressed initrd image in a predetermined location in memory, decompresses it, mounts it, and loads all necessary drivers.
Next, it initializes virtual devices related to the file system, such as LVM or software RAID before unmounting the initrd disk image and freeing up all the memory the disk image once occupied. The kernel then creates a root device, mounts the root partition read-only, and frees any unused memory. At this point, the kernel is loaded into memory and operational.
這個核心檔案通常被放置成 /boot/vmlinuz-xxx ,不過也不見得, 因為一部主機上面可以擁有多個核心檔��案,只是開機的時候僅能選擇一個來載入而已。 甚至我們也可以在一個 distribution 上面放置多個核心,然後以這些核心來做成多重開機呢!
自製核心 - 核心編譯
剛剛上面談到的核心其實是一個檔案,那麼這個檔案怎麼來的?當然是透過原始碼 (source code) 編譯而成的啊!因為核心是直接被讀入到主記憶體當中的,所以當然要將他編譯成為系統可以認識的資料才行!也就是說, 我們必須要取得核心的原始碼,然後利用第二十一章 Tarball 安裝方式提到的編譯概念來達成核心的編譯才行啊!
關於驅動程式 - 是廠商的責任還是核心的責任?
現在我們知道硬體的驅動程式可以編譯成為核心模組,所以可以在不改變核心的前提下驅動你的新硬體。 但是,很多朋友還是常常感到困惑,就是 Linux 上面針對最新硬體的驅動程式總是慢了幾個腳步, 所以覺得好像 Linux 的支援度不足!其實不可以這麼說的,為什麼呢?因為在 Windows 上面,對於最新硬體的驅動程式需求,基本上,也都是廠商提供的驅動程式才能讓該硬體工作的, 因此,在這個『驅動程式開發』的工作上面來說,應該是屬於硬體發展廠商的問題, 因為他要我們買他的硬體,自然就要提供消費者能夠使用的驅動程式啦!
所以,如果大家想要讓某個硬體能夠在 Linux 上面跑的話,那麼似乎可以發起一人一信的方式,強烈要求硬體開發商發展 Linux 上面的驅動程式!這樣一來,也可以促進 Linux 的發展呢!
Stage-5 INIT
Looks at the /etc/inittab file to decide the Linux run level, Following are the available run levels
$ vi /etc/inittab

# 0 - halt
# 1 - Single user mode
# 2 - Multiuser, without NFS
# 3 - Full multiuser mode
# 4 - unused
# 5 - X11
# 6 - reboot
Init identifies the default initlevel from /etc/inittab and uses that to load all appropriate program. Execute ‘grep initdefault /etc/inittab’ on your system to identify the default run level If you want to get into trouble, you can set the default run level to 0 or 6. Since you know what 0 and 6 means, probably you might not do that. Typically you would set the default run level to either 3 or 5.
The first thing the kernel does after completing the boot process is to execute init program. The /sbin/init program (also called init) coordinates the rest of the boot process and configures the environment for the user. Init is the root/parent of all processes executing on Linux which becomes process number 1.
The first few process Ids are given below:-
- Init Process
- kflushd(bdflush) : Started by update does a more imperfect sync more frequently
- kupdate : Does a sync every 30 seconds
- kpiod
- kswapd
- mdrecoveryd
Processes 2, 3, 4, 5 and 6 are kernel daemons. The kernel daemons are started after init, so they get process numbers like normal processes do. But their code and data lives in the kernel’s part of the memory.
Kflushd and Kupdate :- Input and output is done via buffers in memory. This allows things to run faster and the data in the buffer are written to disk in larger more efficient chunks.The daemons kflushd and kupdate handle this work. kupdate runs periodically (5 seconds) to check whether there are any dirty buffers. If there are, it gets kflushd to flush them to disk.
Kswap and Kpiod :- System memory can be better managed by shifting unused parts of running programs out to the swap partition(s) of the hard disk. Moving this data in and out of memory as needed is done by kpiod and kswapd. Every second or so, kswapd wakes up to check out the memory situation, and if something on the disk is needed in memory, or there is not enough free memory, kpiod is called in.
Mdrecoveryd :- mdrecoveryd is part of the Multiple Devices package used for software RAID and combining multiple disks into one virtual disk Basically it is part of the kernel. It can be removed from the kernel by deselecting it (CONFIG_BLK_DEV_MD) and recompiling the kernel.
Stage – 6 Run Level programs
When the Linux system is booting up, you might see various services getting started. For example, it might say “starting sendmail …. OK”. Those are the runlevel programs, executed from the run level directory as defined by your run level. Depending on your default init level setting, the system will execute the programs from one of the following directories.
Run level 0 – /etc/rc.d/rc0.d/
Run level 1 – /etc/rc.d/rc1.d/
Run level 2 – /etc/rc.d/rc2.d/
Run level 3 – /etc/rc.d/rc3.d/
Run level 4 – /etc/rc.d/rc4.d/
Run level 5 – /etc/rc.d/rc5.d/
Run level 6 – /etc/rc.d/rc6.d/
Please note that there are also symbolic links available for these directory under /etc directly. So, /etc/rc0.d is linked to /etc/rc.d/rc0.d. Under the /etc/rc.d/rc*.d/ directories, you would see programs that start with S and K. Programs starts with S are used during startup. S for startup. Programs starts with K are used during shutdown. K for kill. There are numbers right next to S and K in the program names. Those are the sequence number in which the programs should be started or killed. For example, S12syslog is to start the syslog deamon, which has the sequence number of 12. S0 sendmail is to start the sendmail daemon, which has the sequence number of 80. So, syslog program will be started before sendmail.
There you have it. That is what happens during the Linux boot process.