Elastic Beanstalk
Overview
Elastic Beanstalk is a PaaS-like layer on top of AWS's IaaS services which abstracts away the underlying EC2 instances, Elastic Load Balancers, auto-scaling groups, etc. This makes it a lot easier for developers, who don't want to be dealing with all the systems stuff, to get their application quickly deployed on AWS.
Elastic Beanstalk Architecture
When deploying an app on Elastic Beanstalk, the service creates the following:
- Elastic Beanstalk Environment: This is the runtime environment for the application. The service automatically creates a URL for access to the application and a CNAME.
- EC2 Instances: These are the compute nodes for the application.
- Autoscaling Group: It handles scaling the compute nodes. Although the autoscaling group handles provisioning, developers can configure how many to establish. They can also specify when autoscaling can start.
- Elastic Load Balancer: It distributes web requests across the compute nodes.
- Security Groups: Specifies what network traffic is allowed in and out of the application.
- Host Manager: The host manager is a service on each compute node that monitors the node for performance issues.
2 default alarms in ASG
The Auto Scaling group in your Elastic Beanstalk environment uses two Amazon CloudWatch alarms to trigger scaling operations. The default triggers scale when the average outbound network traffic from each instance
- is higher than 6 MB
- or lower than 2 MB over a period of five minutes.
Permission
When you create an environment, AWS Elastic Beanstalk prompts you to provide the following AWS Identity and Access Management (IAM) roles:
- Service role: Elastic Beanstalk assumes a service role to use other AWS services on your behalf when manage and deploy your web applications.
- Instance profile Elastic Beanstalk applies instances profile to the EC2 instances in your environment. It allows them to do the following:
- Retrieve application versions from Amazon Simple Storage Service (Amazon S3).
- Upload logs to Amazon S3.
- Perform other tasks that vary depending on the environment type and platform.
Q: While creating an Elastic bean stalk environment via CLI, you receive an error message - The instance profile aws-elasticbeanstalk-ec2-role associated with the environment does not exist. Why does this happen?
A: AWS EB CLI cannot create the instance profile for your beanstalk environment if your IAM role has no permission to creating roles.
Logging in to the CLI also assumes the Elastic Beanstalk role in your account which means it has already been associated a role already, just hasn't had enough permission.
Workflow of Elastic Beanstalk.
To use Elastic Beanstalk, you create an application, upload an application version in the form of an application source bundle (for example, a Java .war file) to Elastic Beanstalk, and then provide some information about the application. Elastic Beanstalk automatically launches an environment and creates and configures the AWS resources needed to run your code. After your environment is launched, you can then manage your environment and deploy new application versions.
The following diagram illustrates the workflow of Elastic Beanstalk.
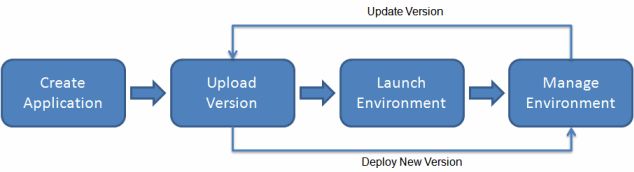
Source: What is AWS Elastic Beanstalk?
After you create and deploy your application, information about the application—including metrics, events, and environment status—is available through the Elastic Beanstalk console, APIs, or Command Line Interfaces, including the unified AWS CLI.
Deployment
The following list provides summary information about the different deployment policies and adds related considerations.
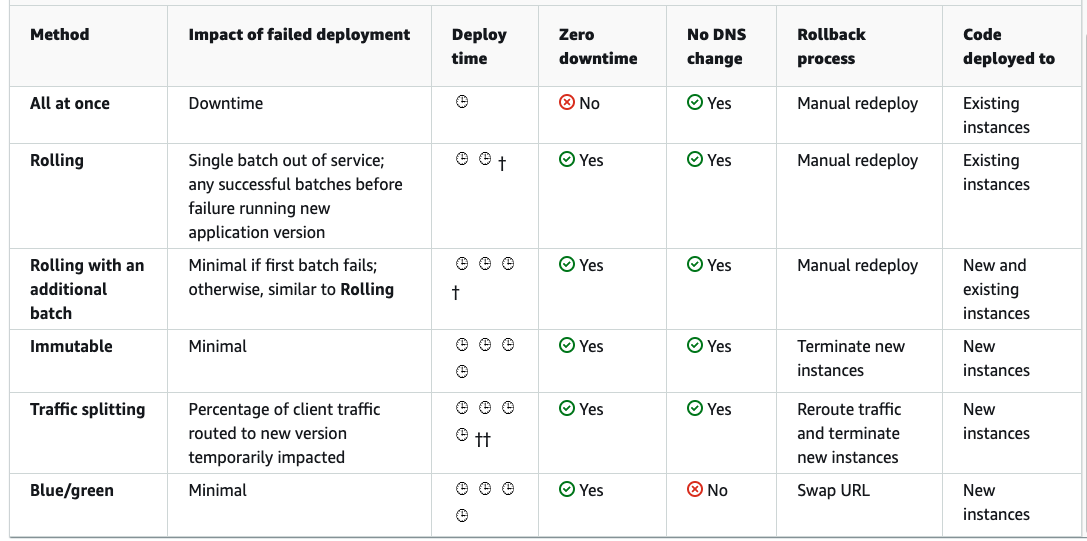
Source: Deploying applications to Elastic Beanstalk environments
- All at once - The quickest deployment method. Suitable if you can accept a short loss of service, and if quick deployments are important to you. With this method, Elastic Beanstalk deploys the new application version to each instance. Then, the web proxy or application server might need to restart. As a result, your application might be unavailable to users (or have low availability) for a short time.
- Rolling - Avoids downtime and minimizes reduced availability, at a cost of a longer deployment time. Suitable if you can't accept any period of completely lost service. With this method, your application is deployed to your environment one batch of instances at a time. Most bandwidth is retained throughout the deployment.
- Rolling with additional batch - This policy deploys the new version in batches, but first launches a new batch of instances to ensure full capacity during the deployment process. This policy avoids any reduced availability, at a cost of an even longer deployment time compared to the Rolling method. Suitable if you must maintain the same bandwidth throughout the deployment. These increase the costs as you're adding extra instances during the deployment.
- Immutable - A slower deployment method, that ensures the new application version is always deployed to new instances, instead of updating existing instances. It also has the additional advantage of a quick and safe rollback in case the deployment fails. With this method, Elastic Beanstalk performs an immutable update to deploy your application. In an immutable update, a second Auto Scaling group is launched in your environment and the new version serves traffic alongside the old version until the new instances pass health checks.
- Traffic splitting - A canary testing deployment method. Suitable if you want to test the health of your new application version using a portion of incoming traffic, while keeping the rest of the traffic served by the old application version.
Deployment failure
Using Blue/Green deployment to redeploy is the quickest among all the others deployment methods, the rollback process is very quick via swapping the CNAMEs via Route 53 for the two environments.
- Rolling - The rollback process is via manual redeploy, so it's not as quick as the Immutable deployment.
- Rolling with additional batch - The rollback process is via manual redeploy, so it's not as quick as the Immutable deployment.
- Immutable - In case of deployment failure, the new instances are terminated, so the impact is minimal.
- All at once - the application sees a downtime
Migrate the Elastic Beanstalk environment from account A to B
In order the migrate Elastic Beanstalk accross accuonts, you need to create a saved configuration in Team A's account and download it to your local machine. Make the account-specific parameter changes and upload to the S3 bucket in Team B's account. From Elastic Beanstalk console, create an application from 'Saved Configurations
Reference: You must use saved configurations to migrate an Elastic Beanstalk environment between AWS accounts. You can save your environment's configuration as an object in Amazon S3 that can be applied to other environments during environment creation, or applied to a running environment. Saved configurations are YAML formatted templates that define an environment's platform version, tier, configuration option settings, and tags.
Decouple the database from EB without downtime
Take a snapshot of the database and terminate the current environment. Create a new one without attaching an RDS instance directly to it (from the snapshot).
Attaching an RDS DB instance to an Elastic Beanstalk environment is ideal for development and testing environments. However, it's not recommended for production environments because the lifecycle of the database instance is tied to the lifecycle of your application environment. If you terminate the environment, then you lose your data because the RDS DB instance is deleted by the environment.
To resolve the issue of avoiding downtime on the database while decoupling it from the Elastic Beanstalk environment, follow these steps:
- Perform an Elastic Beanstalk blue/green deployment to decouple the RDS DB instance from environment A.
- Take an RDS DB snapshot for backup purposes.
- Enable
Deletion Protectionfor the RDS DB instance to prevent accidental deletion.
- Create a new Elastic Beanstalk environment (environment B) without including the RDS DB instance in the same application.
- Configure environment B with the necessary information to connect to the RDS DB instance.
- This ensures the database remains intact while deploying and managing the new environment. These steps will allow you to maintain database availability while decoupling it from the original Elastic Beanstalk environment.
option_settings in .ebextensions/
You can use the option_settings key to modify the Elastic Beanstalk configuration and define variables that can be retrieved from your application using environment variables. Some namespaces allow you to extend the number of parameters, and specify the parameter names. For a list of namespaces and configuration options, see Configuration options.
Option settings can also be applied directly to an environment during environment creation or an environment update. Settings applied directly to the environment override the settings for the same options in configuration files. If you remove settings from an environment's configuration, settings in configuration files will take effect. See Precedence for details.
The following examples set a Tomcat platform-specific option in the aws:elasticbeanstalk:container:tomcat:jvmoptions namespace and an environment property named MYPARAMETER.
option_settings:
  aws:elasticbeanstalk:container:tomcat:jvmoptions:
    Xmx: 256m
  aws:elasticbeanstalk:application:environment:
    MYPARAMETER: parametervalue