Cloudformation
AWS CloudFormation is an AWS service that allows you to define and provision infrastructure as code, making it easier to create and manage AWS resources. It enables users to describe and set up all the resources needed for their applications, ensuring consistency and ease of replication. CloudFormation templates define the resources, their configurations, and the relationships between them in a JSON or YAML file.
EC2 interaction
User Data in EC2
Check user data scripts for more information.
- We can have user data at EC2 instance launch through the console
- We can also include it in CloudFormation
- The important thing to pass is the entire script through the function Fn::Base64
- Good to know: user data script log is in
/var/log/cloud-init-output.loginside the EC2 instances that are created by CloudFormation
#  the vertical pipe here means that this whole thing is one giant string with new lines.
UserData:
  Fn::Base64: !Sub |
     ACCESS_KEY=${AccessKey}
     SECRET_KEY=${SecretKey}
EC2 Helper scripts
Source: CloudFormation – 3 – User data, cfn
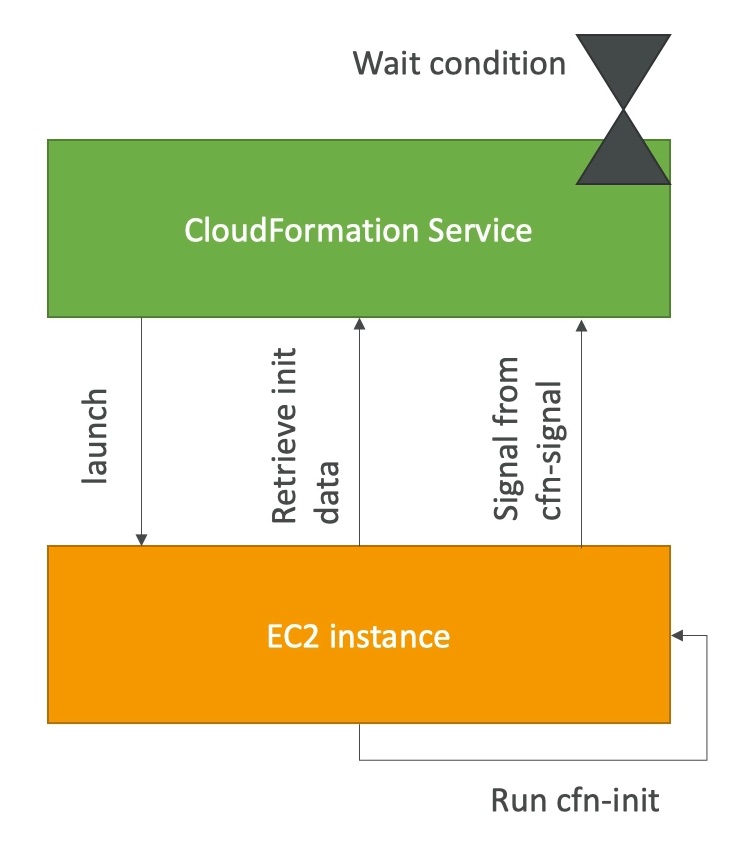
cfn-init
:::infocfn-init vs user-data
A major benefit of AWS::CloudFormation::Init over UserData is that the former is updatable -- if you modify the AWS::CloudFormation::Init section, CloudFormation will update your EC2 instance in place, whereas if you modify the UserData property of an EC2 resource in your template and update your stack, CloudFormation will replace that EC2 instance.
This is handy, for example, if you want to update the packages you have installed on your EC2 instance without recreating it. :::
cfn-initis a helper script that is executed on an EC2 instance as part of the instance's user data during stack creation or update.- It is used to handle the instance configuration and perform tasks such as installing packages, setting up configurations, and running custom scripts.
cfn-initprocesses the metadata defined in the CloudFormation template under the "AWS::CloudFormation::Init" key and performs the specified tasks accordingly. The metadata can include packages to install, files to create, services to enable, and commands to execute during instance initialization.
cfn-signal
cfn-signalis a helper script to signal the status of an AWS CloudFormation stack resource.- It is commonly used in conjunction with
WaitOnResourceSignalsproperty inUpdatePolicyattribute andTimeoutproperty inCreationPolicyattribute.CreationPolicy- Associate the CreationPolicy attribute with a resource to prevent its status from reaching create complete until AWS CloudFormation receives a specified number of success signals or the timeout period is exceeded- You want to make sure the newly deployed instances are healthy first before the old instances are taken down for replacement. To solve this, you will need to use the
UpdatePolicyattribute on CloudFormation and enable theWaitOnResourceSignalsproperty.
- When AWS CloudFormation creates or updates resources with those policies, it suspends work on the stack until the resource receives the requisite number of signals or until the timeout period is exceeded.
- During the stack creation or update process,
cfn-signalis typically called from withinuser-datascripts running on EC2 instances to notify AWS CloudFormation about the successful initialization of the instance. The works are suspended on the stack until..- the resource receives the requisite number of signals (This signals that the instance is ready and healthy to proceed with the stack creation or update process.) or
- the timeout period is exceeded
Example:
AutoScalingGroup:
  Type: AWS::AutoScaling::AutoScalingGroup
  Properties:
    AvailabilityZones:
      Fn::GetAZs: ''
    LaunchConfigurationName:
      Ref: LaunchConfig
    DesiredCapacity: '3'
    MinSize: '1'
    MaxSize: '4'
  CreationPolicy:
    ResourceSignal:
      Count: '3'
      Timeout: PT15M
  UpdatePolicy:
    AutoScalingScheduledAction:
      IgnoreUnmodifiedGroupSizeProperties: 'true'
    AutoScalingRollingUpdate:
      MinInstancesInService: '1'
      MaxBatchSize: '2'
      PauseTime: PT1M
      WaitOnResourceSignals: 'true'
LaunchConfig:
  Type: AWS::AutoScaling::LaunchConfiguration
  Properties:
    ImageId: ami-16d18a7e
    InstanceType: t2.micro
    UserData:
      "Fn::Base64":
        !Sub |
          #!/bin/bash -xe
          yum update -y aws-cfn-bootstrap
          /opt/aws/bin/cfn-signal -e $? --stack ${AWS::StackName} --resource AutoScalingGroup --region ${AWS::Region}
WaitCondition
WaitCondition, as the name suggests, is a tool used to control the order of creation of the AWS resources in a CloudFormation stack. It can pause the creation of a stack and wait for a signal to ensure that specific resources and configurations were properly launched before resuming the stack creation process. For example, you might want to download and configure applications on an Amazon EC2 instance before considering the creation of that Amazon EC2 instance complete.
Below is an example of WaitCondition that waits for the desired number of instances in a web server group
WebServerGroup:
  Type: AWS::AutoScaling::AutoScalingGroup
  Properties:
    AvailabilityZones:
      Fn::GetAZs: ''
      LaunchConfigurationName: !Ref 'LaunchConfig'
    MinSize: '1'
    MaxSize: '5'
    DesiredCapacity: !Ref 'WebServerCapacity'
    LoadBalancerNames:
      - !Ref 'ElasticLoadBalancer'
WaitHandle:
  Type: AWS::CloudFormation::WaitConditionHandle
WaitCondition:
  Type: AWS::CloudFormation::WaitCondition
  DependsOn: WebServerGroup
  Properties:
    Handle: !Ref 'WaitHandle'
    Timeout: '300'
    Count: !Ref 'WebServerCapacity'
Q: How to resolve a situation where wait condition didn't receive the required number of signals from an Amazon EC2 Instance?
Answer:
- Ensure that the AMI you're using has the AWS CloudFormation helper scripts installed. If the AMI doesn't include the helper scripts, you can also download them to your instance.
- Verify that the cfn-init & cfn-signal command was successfully run on the instance. You can view logs, such as
/var/log/cloud-init.logor/var/log/cfn-init.log, to help you debug the instance launch. - You can retrieve the logs by logging in to your instance, but you must disable rollback on failure or else by default AWS CloudFormation deletes the instance after your stack fails to create.
- Verify that the instance has a connection to the Internet. If the instance is in a VPC, the instance should be able to connect to the Internet through a NAT device if it's is in a private subnet or through an Internet gateway if it's in a public subnet.
- For example, run: curl -I https://aws.amazon.com
WaitCondition vs CreationPolicy
You can associate the CreationPolicy attribute with a resource to prevent its status from reaching create complete until AWS CloudFormation receives** a specified number of success signals or the timeout period is exceeded**.
Currently, only AutoScalingGroup, EC2 Instance & WaitCondition resources support the CreationPolicy attribute. Both WaitCondition & CreationPolicy delay the creation of the stack until they receive a specified number of “success signals”.
- While CreationPolicy causes the creation status of its parent resource to stay in
CREATE_IN_PROGRESS, aWaitConditionon the other hand, being a resource in itself, waits inCREATE_IN_PROGRESSstate, thus blocking the stack from reaching the CREATE_COMPLETE state. - Use cases
- When you need to pause the creation of multiple instances in an auto-scaling group & make the stack wait for applications to be installed & started on the instances, think CreationPolicy.
- When you want to coordinate a resource creation with actions external to the stack, think
WaitConditionwith aDependsOnattribute on the resource.
Sections
Mappings
The optional Mappings section matches a key to a corresponding set of named values. For example, if you want to set values based on a region, you can create a mapping that uses the region name as a key and contains the values you want to specify for each specific region. You use the Fn::FindInMap intrinsic function to retrieve values in a map.
AWSTemplateFormatVersion: "2010-09-09"
Mappings:
  RegionMap:
    us-east-1:
      HVM64: ami-0ff8a91507f77f867
      HVMG2: ami-0a584ac55a7631c0c
    us-west-1:
      HVM64: ami-0bdb828fd58c52235
      HVMG2: ami-066ee5fd4a9ef77f1
    eu-west-1:
      HVM64: ami-047bb4163c506cd98
      HVMG2: ami-0a7c483d527806435
    ap-northeast-1:
      HVM64: ami-06cd52961ce9f0d85
      HVMG2: ami-053cdd503598e4a9d
    ap-southeast-1:
      HVM64: ami-08569b978cc4dfa10
      HVMG2: ami-0be9df32ae9f92309
Resources:
  myEC2Instance:
    Type: "AWS::EC2::Instance"
    Properties:
      ImageId: !FindInMap [RegionMap, !Ref "AWS::Region", HVM64]
      InstanceType: m1.small
Configurations
DependsOn
With the DependsOn attribute you can specify that the creation of a specific resource follows another. When you add a DependsOn attribute to a resource, that resource is created only after the creation of the resource specified in the DependsOn attribute.
You can use the DependsOn attribute with any resource. Here are some typical uses:
- Determine when a wait condition goes into effect.
- Declare dependencies for resources that must be created or deleted in a specific order. For example, you must explicitly declare dependencies on gateway attachments for some resources in a VPC. For example, an Amazon EC2 instance with a public IP address is dependent on the VPC-gateway attachment if the VPC and Internet Gateway resources are also declared in the same template.
AWSTemplateFormatVersion: '2010-09-09'
Resources:
  Ec2Instance:
    Type: AWS::EC2::Instance
    Properties:
      ImageId:
        Fn::FindInMap:
        - RegionMap
        - Ref: AWS::Region
        - AMI
    DependsOn: myDB
  myDB:
    Type: AWS::RDS::DBInstance
    Properties:
      AllocatedStorage: '5'
      DBInstanceClass: db.t2.small
      Engine: MySQL
      EngineVersion: '5.5'
      MasterUsername: MyName
      MasterUserPassword: MyPassword
DeletionPolicy
You can put a DeletionPolicy on any resource to control what happens when the CloudFormation template is deleted
DeletionPolicy: Retain- Specify on resources to preserve / backup in case of CloudFormation deletes
- To keep a resource, specify Retain (works for any resource / nested stack)
DeletionPolicy: Snapshot- EBS Volume, ElastiCache Cluster, ElastiCache ReplicationGroup
- RDS DBInstance, RDS DBCluster, Redshift Cluster
DeletePolicy: Delete(default behavior)- Note: for AWS::RDS::DBCluster resources, the default policy is Snapshot
- Note: to delete an S3 bucket, you need to first empty the bucket of its content
NewVolume:
  Type: AWS::EC2::Volume
  Properties:
    Size: 100
    Encrypted: true
    AvailabilityZone: !GetAtt Ec2Instance.AvailabilityZone
    Tags:
      - Key: MyTag
        Value: TagValue
  DeletionPolicy: Snapshot
OnFailure for CreateStack call
You can use the OnFailure property of the CloudFormation CreateStack call for this use-case. The OnFailure property determines what action will be taken if stack creation fails. This must be one of DO_NOTHING, ROLLBACK, or DELETE. You can specify either OnFailure or DisableRollback, but not both.
Using the OnFailure property, you can prevent the termination of the EC2 instances created by the CloudFormation stack. Below is the example
https://cloudformation.us-east-1.amazonaws.com/
 ?Action=CreateStack
 &StackName=MyStack
 &TemplateBody=[Template Document]
 &NotificationARNs.member.1=arn:aws:sns:us-east-1:1234567890:my-topic
 &Parameters.member.1.ParameterKey=AvailabilityZone
 &Parameters.member.1.ParameterValue=us-east-1a
 &Version=2010-05-15
 &SignatureVersion=2
 &Timestamp=2010-07-27T22%3A26%3A28.000Z
 &AWSAccessKeyId=[AWS Access KeyID]
 &Signature=[Signature]
 &OnFailure=DO_NOTHING
Features
ChangeSet
 Reference: Updating stacks using change sets
Change sets allow you to preview how proposed changes to a stack might impact your existing resources, for example, whether your changes will delete or replace any critical resources, AWS CloudFormation makes the changes to your stack only when you decide to execute the change set, allowing you to decide whether to proceed with your proposed changes or explore other changes by creating another change set. You can create and manage change sets using the AWS CloudFormation console, AWS CLI, or AWS CloudFormation API.
After you execute a change, AWS CloudFormation removes all change sets that are associated with the stack because they aren't applicable to the updated stack.
AWS CloudFormation provides two methods for updating stacks:
- Direct update
- Creating and executing change sets.
When you directly update a stack, you submit changes and AWS CloudFormation immediately deploys them. Use direct updates when you want to quickly deploy your updates.
Stack Policy
TL;DR - Think Stack Policy as a temperate protection to the resources that going to be affected by a stack update.
Stack policies help protect critical stack resources from unintentional updates that could cause resources to be interrupted or even replaced. A stack policy is a JSON document that describes what update actions can be performed on designated resources. Specify a stack policy whenever you create a stack that has critical resources.
- When you create a stack, all update actions are allowed on all resources. By default, anyone with stack update permissions can update all of the resources in the stack. You can prevent stack resources from being unintentionally updated or deleted during a stack update by using a stack policy.
- After you set a stack policy, all of the resources in the stack are protected by default. To allow updates on specific resources, you specify an explicit
Allowstatement for those resources in your stack policy; otherwise, no changes are made to protected resources.
The following example stack policy prevents updates to the ProductionDatabase resource:
{
  "Statement" : [
    {
      "Effect" : "Allow",
      "Action" : "Update:*",
      "Principal": "*",
      "Resource" : "*"
    },
    {
      "Effect" : "Deny",
      "Action" : "Update:*",
      "Principal": "*",
      "Resource" : "LogicalResourceId/ProductionDatabase"
    }
  ]
}
This policy allows updates to all resources except for the MyDatabase, which is denied by default.
{
  "Statement" : [
    {
      "Effect" : "Allow",
      "Action" : "Update:*",
      "Principal": "*",
      "NotResource" : "LogicalResourceId/MyDatabase"
    }
  ]
}
Further reading: Prevent updates to stack resources
Termination protection
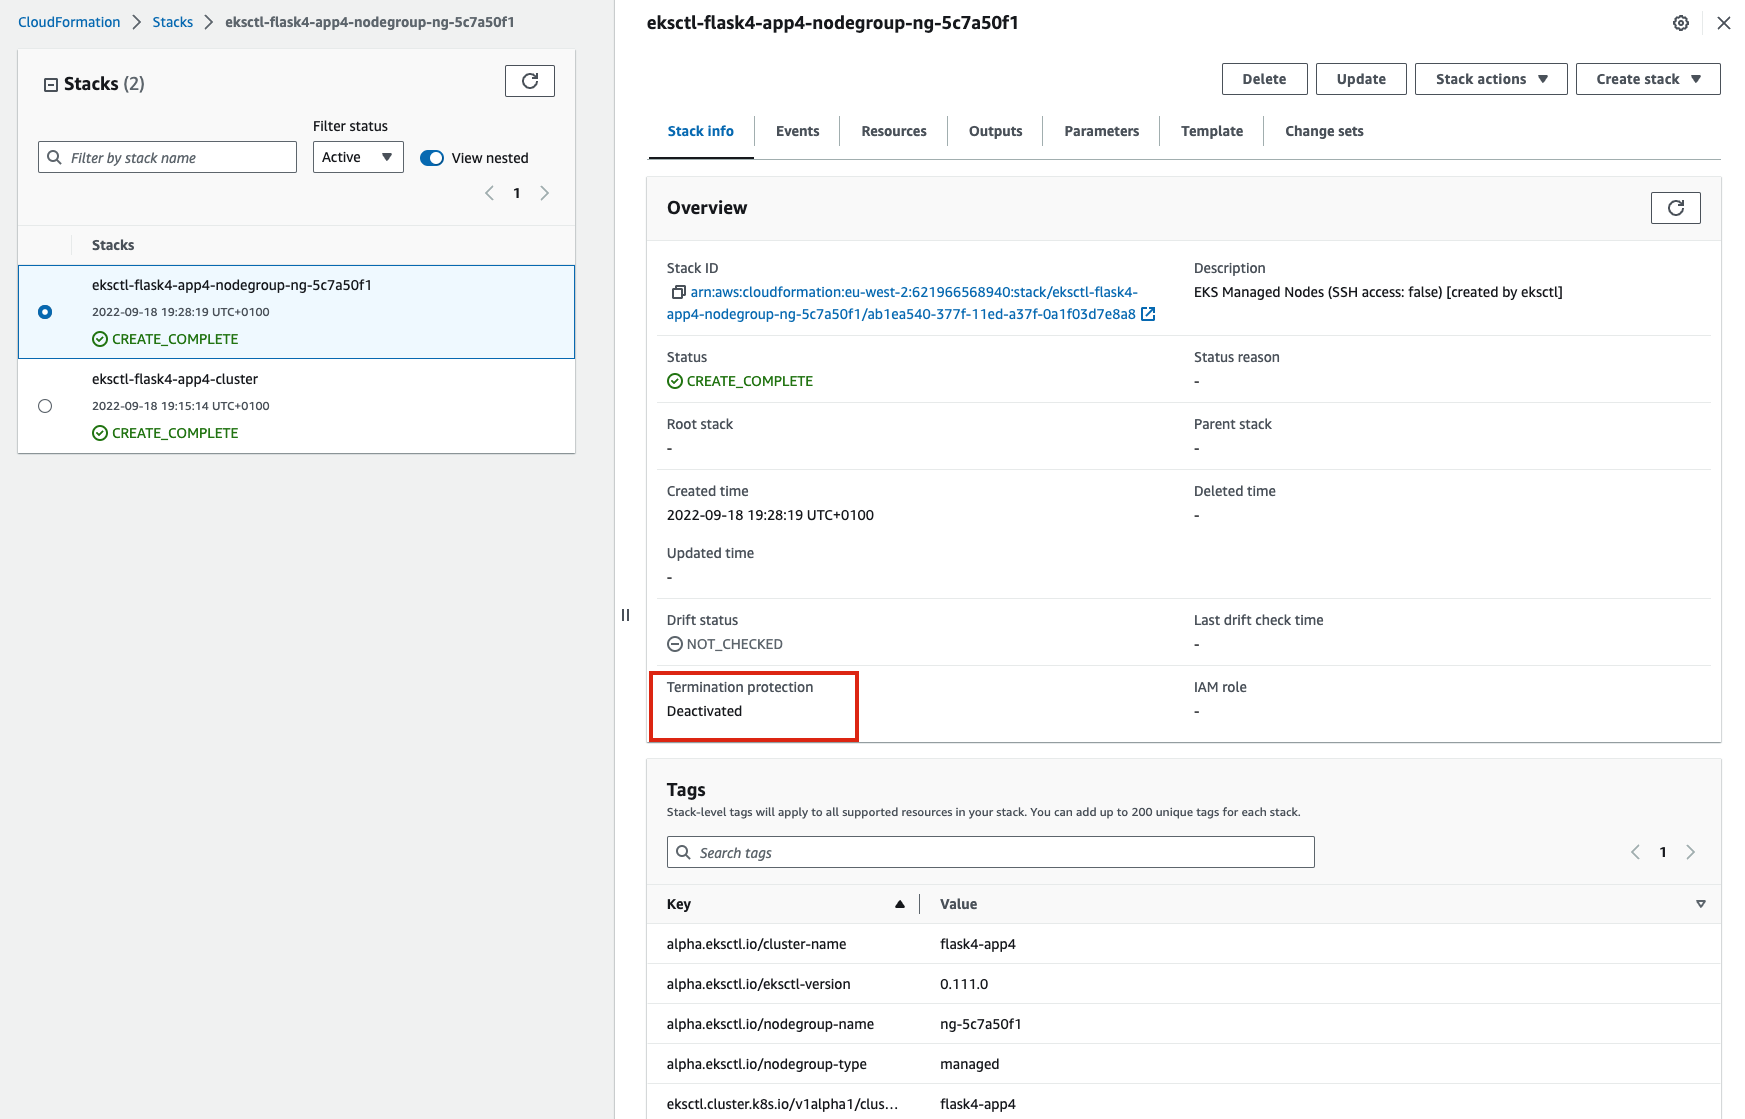
You cannot delete stacks that have termination protection enabled. If you attempt to delete a stack with termination protection enabled, the deletion fails and the stack(including its status) remains unchanged.
- Solution: Disable termination protection on the stack, then perform the delete operation again.
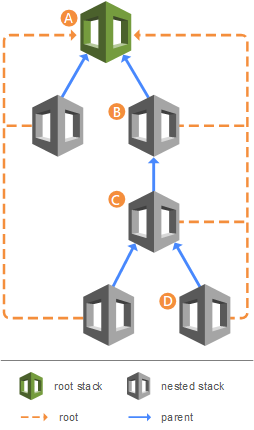
This includes nested stacks whose root stacks have termination protection enabled.
- Solution: Disable termination protection on the root stack, then perform the delete operation again. It is strongly recommended that you do not delete nested stacks directly, but only delete them as part of deleting the root stack and all its resources.
Lambda target of a custom resource
Custom resources allow you to programmatically provision AWS resources anytime a cloudformation stack has been created, updated(if you changed the custom resource) or deleted.
When specifying a Lambda function as the target of a custom resource, the function is invoked whenever the custom resource is created, updated, or deleted. AWS CloudFormation calls a Lambda API to invoke the function and to pass all the request data (such as the request type and resource properties) to the function.
The power and customizability of Lambda functions in combination with AWS CloudFormation enable a wide range of scenarios, such as..
- dynamically looking up AMI IDs during stack creation
- automatically copy objects from an existing S3 bucket into the new one
- implementing and using utility functions, such as string reversal functions
To copy all the objects from an existing S3 bucket to a new S3 bucket created by the CloudFormation template, you need to create a custom Lambda function that can copy the objects from the source bucket to the new S3 bucket. You can also define the options you want Amazon S3 to apply during replication, such as server-side encryption, replica ownership, and transitioning replicas to another storage class.
Stack
StackSets
TL;DR - You can imagine template is just a class and stackset is a instance of a class which has configured the attributes as same as programming.
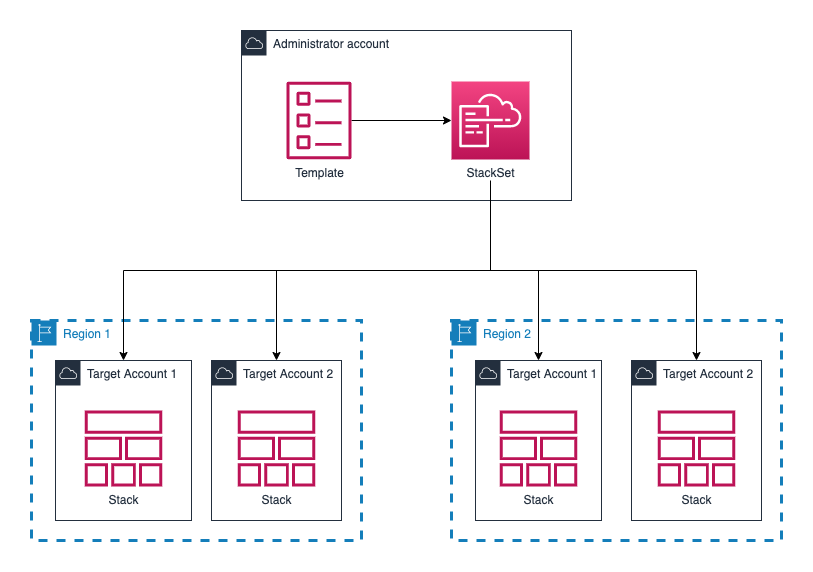
A stack set lets you create stacks in AWS accounts across regions by using a single AWS CloudFormation template. All the resources included in each stack are defined by the stack set’s AWS CloudFormation template. As you create the stack set, you specify the template to use, as well as any parameters and capabilities that the template requires.
OUTDATEDIn the event that the stack operation failed and the stack instance status is OUTDATED, the following are the possible culprits:
- The AWS CloudFormation template might have errors. Validate the template in AWS CloudFormation and fix errors before trying to create your stack set.
- The template could be trying to create global resources that must be unique but aren’t, such as S3 buckets.
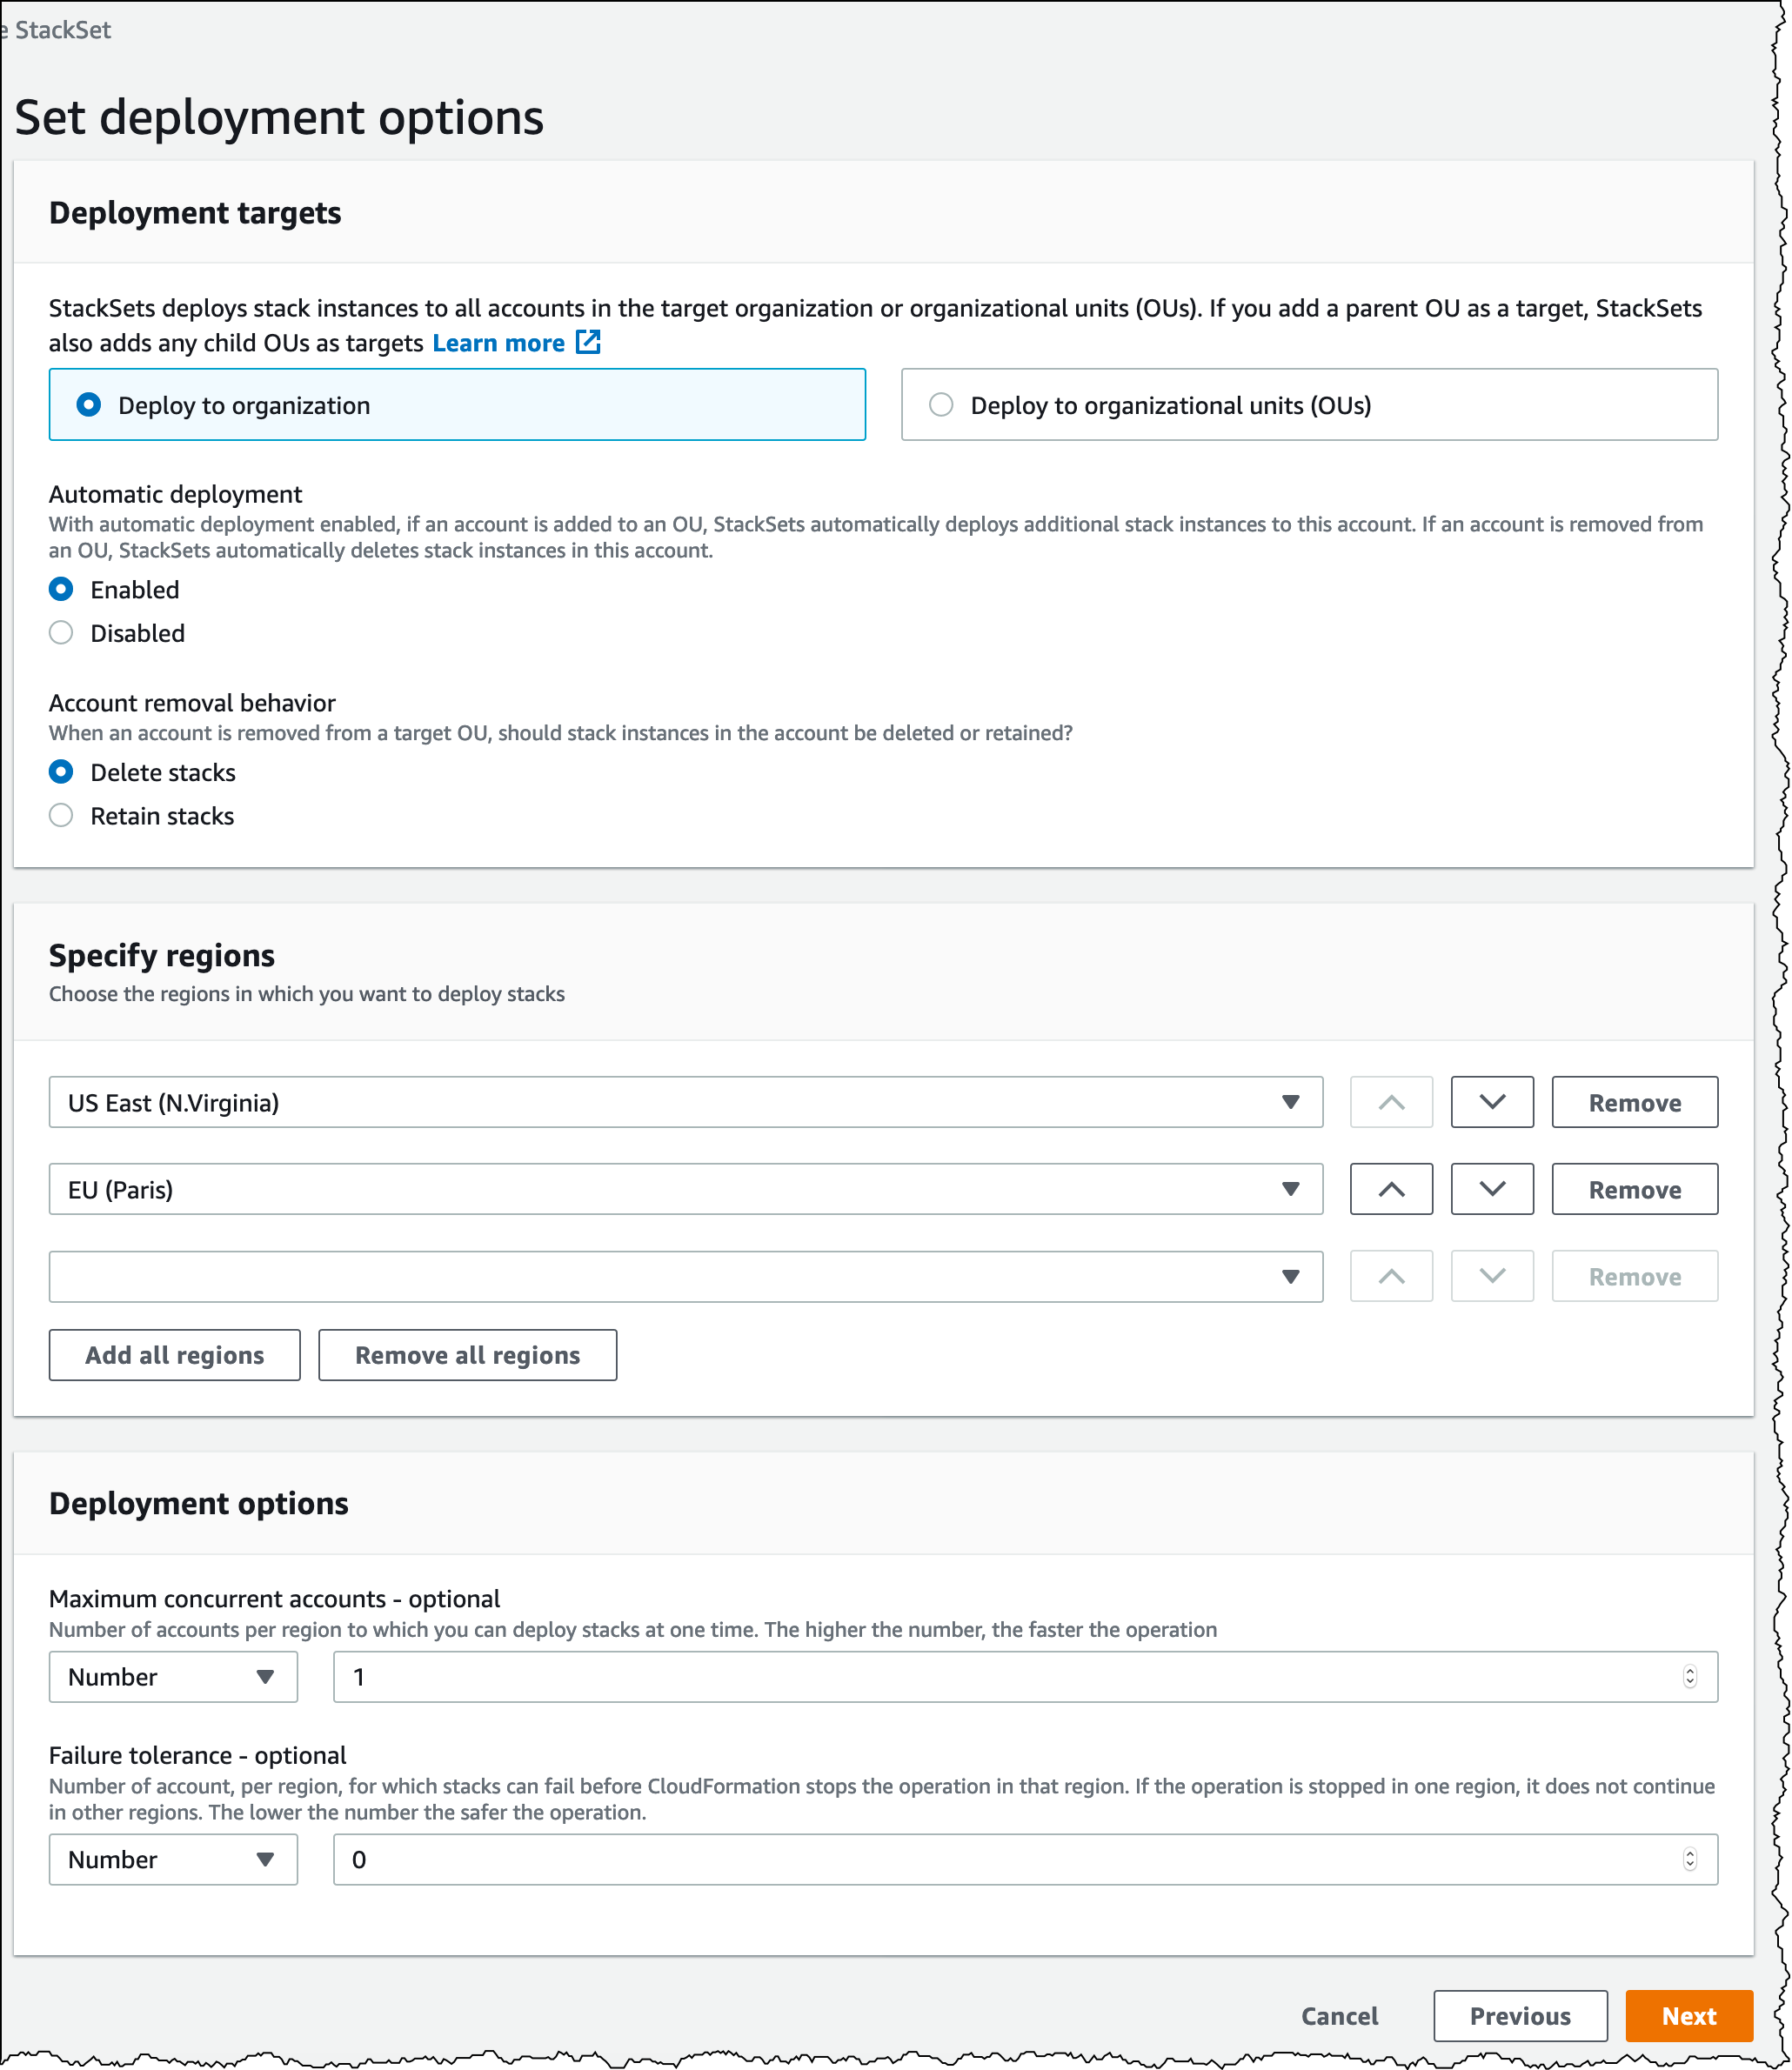
- A specified target account number doesn’t exist. Check the target account numbers that you specified on the Set Deployment Options page of the wizard.
- Insufficient permissions in a target account for creating resources that are specified in your template.
- The administrator account does not have a trust relationship with the target account.
- The maximum number of a resource that is specified in your template already exists in your target account. For example, you might have reached the limit of allowed IAM roles in a target account, but the template creates more IAM roles.
- You have reached the maximum number of stacks that are allowed in a stack set.
StackSets with AWS Organizations
AWS Accounts in multiple regions can now be managed effortlessly with StackSets. Previously, account grouping was mainly for billing, but with AWS Organizations, you gain centralized control over multiple accounts for various needs like billing, access control, compliance, security, and resource sharing.
- StackSets allow you to easily orchestrate any AWS CloudFormation service across accounts and regions.
- You can deploy IAM roles, EC2 instances, or Lambda functions across your organization's accounts and regions. StackSets simplify cross-account permissions configuration and automate resource creation and deletion when joining or removing accounts from your Organization.
- Enable data sharing, use the StackSets console, and leverage the service-managed permission model for seamless deployment across your organization.
How to use AWS CloudFormation StackSets for Multiple Accounts in an AWS Organization:
Reference: Use AWS CloudFormation StackSets for Multiple Accounts in an AWS Organization
Nested Stack
A nested stack is a way to encapsulate and manage reusable components within a CloudFormation template. It allows you to create separate CloudFormation templates for individual components and then reference them as a resource within a main CloudFormation template.
This modular approach simplifies template management, promotes reusability, and improves the organization and readability of complex infrastructure deployments. The nested stack acts as a standalone unit with its own set of resources, parameters, and outputs, enabling you to independently create, update, or delete the nested stack while working within the main stack.
- To update a nested stack, always update the parent (root stack)
Resource: Working with nested stacks
AWSTemplateFormatVersion: '2010-09-09'
Resources:
  myStackWithParams:
    Type: AWS::CloudFormation::Stack
    Properties:
      TemplateURL: https://s3.amazonaws.com/cloudformation-templates-us-east-2/EC2ChooseAMI.template
      Parameters:
        InstanceType: t1.micro
        KeyName: mykey
You can then reference values by using the unique name that you specified when you created the parameter. You can integrate Parameter Store with CloudFormation to automate your operational process.
Any time you use a template containing Systems Manager parameters to create/update your stacks, CloudFormation uses the values for these Systems Manager parameters at the time of the create/update operation. So, as parameters are updated in Systems Manager, you can have the new value of the parameter take effect by just executing a stack update operation(calling the update-stack API).
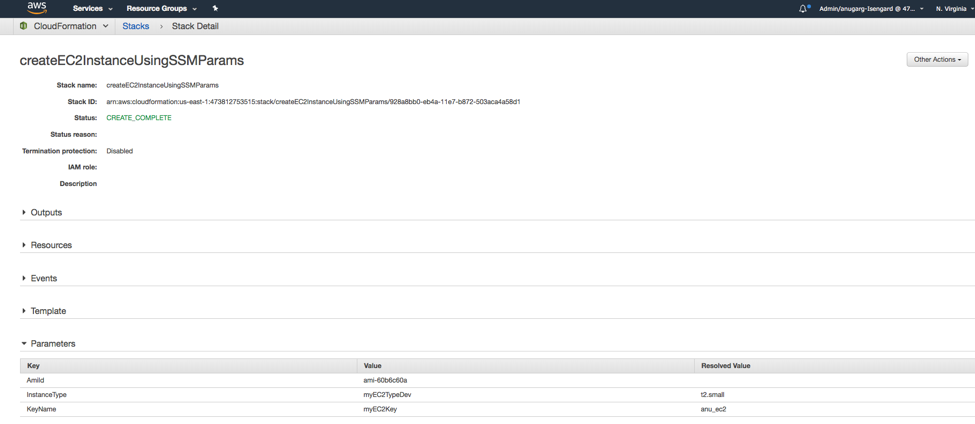
The Parameters section in above screenshot in the output for Describe API will show an additional ‘ResolvedValue’ field that contains the resolved value of the Systems Manager parameter that was used for the last stack operation.
Behavoirs
Next action when it failures
The create-stack CloudFormation CLI command creates a stack as specified in the template. It has an --on-failure optional parameter which determines what action will be taken if stack creation fails.
Its default value is ROLLBACK which means that the CloudFormation service will automatically rollback the stack in the event of failures. The value must be one of the following: DO_NOTHING, ROLLBACK, or DELETE.
Rollback an update
- Behavoir:
- A stack goes into the
UPDATE_ROLLBACK_FAILEDstate when CloudFormation can't roll back all changes during an update - A resource can't return to its original state, causing the rollback to fail
- Example: roll back to an old database instance that was deleted outside CloudFormation
- A stack goes into the
- 2 Solutions
- Continue the rollback
- Fix the errors manually outside of CloudFormation
- Open the AWS CloudFormation console. Select the stack that you want to update, choose Stack action
- Choose Continue update rollback.
- Skip the resources that can't rollback successfully (CloudFormation will mark the failed resources as
UPDATE_COMPLETE)- You must look up and type the logical IDs of the resources that you want to skip.
- Specify only resources that went into the
UPDATE_FAILEDstate during theUpdateRollbackand not during the forward update.
- Continue the rollback
- You can't update a stack in this state
- For nested stacks, rolling back the parent stack will attempt to roll back all the child stacks as well
Self-managed permissions or Service-managed permissions to create Stack sets
TL:DR - If you require custom access controls or want to align permissions with your existing IAM setup, self-managed permissions provide more flexibility. On the other hand, if you prefer a simpler setup and want AWS to handle the IAM roles for you, service-managed permissions offer convenience and consistency.
Stack sets can be created using either self-managed permissions or service-managed permissions.
With service-managed permissions model, you can deploy stack instances to accounts managed by AWS Organizations without creating the necessary IAM roles; StackSets creates the IAM roles on your behalf.
- Before you can use a stack set to create stacks in a target account, you must set up a trust relationship between the administrator and target accounts.
- An administrator account is the AWS account in which you create stack sets. The administrator account is either the organization's management account or a delegated administrator account.
- A target account is an account into which you create, update, or delete one or more stacks in your stack set.
Trouble shooting
Template contains custom named IAM resources
If your template contains custom named IAM resources, don't create multiple stacks reusing the same template. IAM resources must be globally unique within your account. If you use the same template to create multiple stacks in different Regions, your stacks might share the same IAM resources, instead of each having a unique one.
Shared resources among stacks can have unintended consequences from which you can't recover. For example, if you delete or update shared IAM resources in one stack, you will unintentionally modify the resources of other stacks.
Import an existing resource into a stack using the AWS Management Console
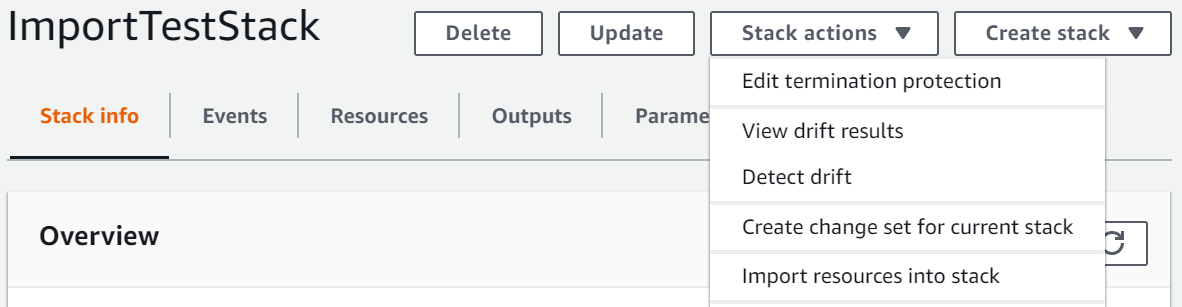
If you created an AWS resource outside of AWS CloudFormation management, you can bring this existing resource which managed manually into AWS CloudFormation management using resource import. You can manage your resources using AWS CloudFormation regardless of where they were created without having to delete and re-create them as part of a stack.
For a list of AWS resources that support import operations, see Resources that support import operations.
Performing a drift detection operation on a stack determines whether the stack has drifted from its expected template configuration, and returns detailed information about the drift status of each resource in the stack that supports drift detection. It is not useful for importing resources into CloudFormation.
Template study
Important functions
!ImportValue- returns the value of theExportfield in the output section by another stack. You typically use this function to create cross-stack references!Ref- Returns the value of the specified parameter or resource.!GetAtt- Returns the value of an attribute from a resource in the template.!Sub- Substitutes variables in an input string with values that you specify.
Export and ImportValue
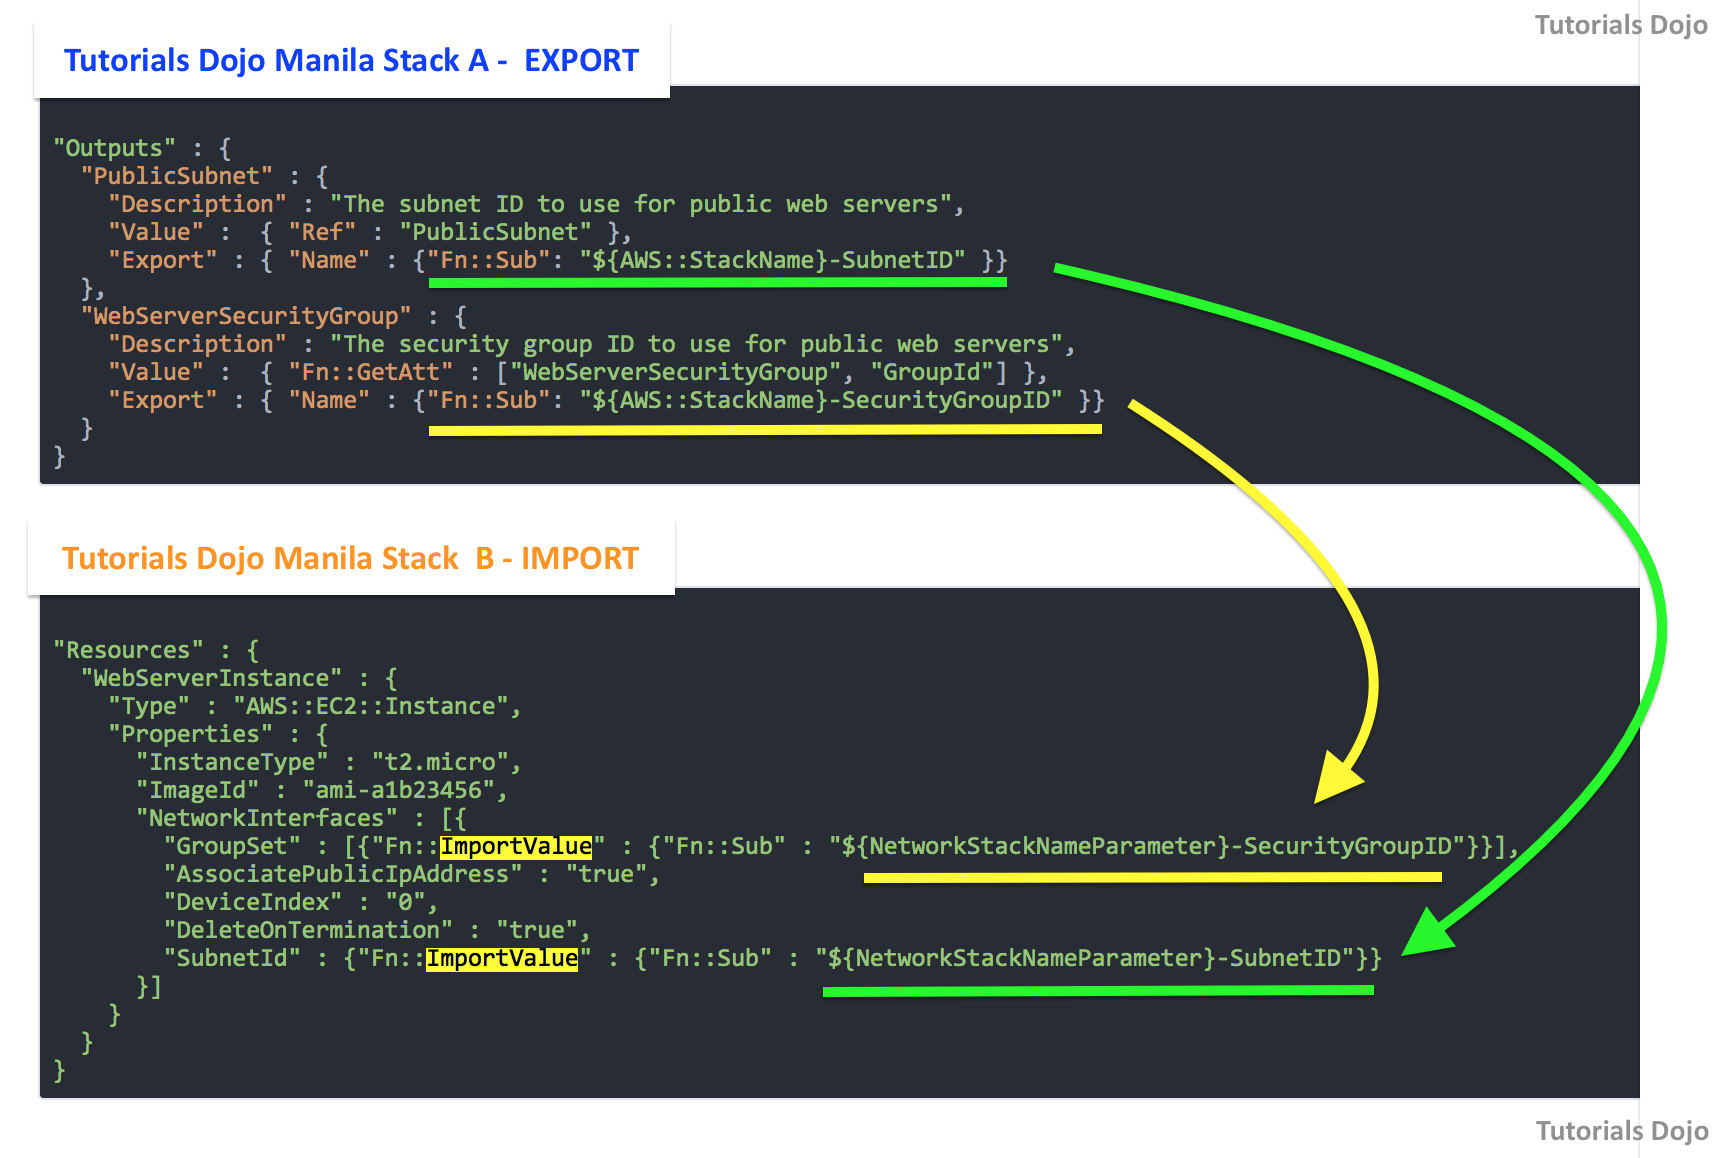
Source: tutorialsdojo
S3
- The template above creates a bucket as a website. The AccessControl property is set to the canned ACL PublicRead (public read permissions are required for buckets set up for website hosting).
- Because this bucket resource has a DeletionPolicy attribute set to Retain, AWS CloudFormation will not delete this bucket when it deletes the stack.
- When run from AWS CLI, URL of the website hosted on S3 will be displayed as output. The Output section uses
Fn::GetAttto retrieve the WebsiteURL attribute and DomainName attribute of the S3Bucket resource.
- The optional
Outputssection declares output values that you can- import into other stacks(to create cross-stack references) by using Export
- return in response in CLI (to describe stack calls)
- view on the AWS CloudFormation console
AWSTemplateFormatVersion: 2010-09-09
Resources:
  S3Bucket:
    Type: AWS::S3::Bucket
    Properties:
      AccessControl: PublicRead
      WebsiteConfiguration:
        IndexDocument: index.html
        ErrorDocument: error.html
    DeletionPolicy: Retain
  BucketPolicy:
    Type: AWS::S3::BucketPolicy
    Properties:
      PolicyDocument:
        Id: MyPolicy
        Version: 2012-10-17
        Statement:
          - Sid: PublicReadForGetBucketObjects
            Effect: Allow
            Principal: '*'
            Action: 's3:GetObject'
            Resource: !Join
              - ''
              - - 'arn:aws:s3:::'
                - !Ref S3Bucket
                - /*
      Bucket: !Ref S3Bucket
Outputs:
  WebsiteURL:
    Value: !GetAtt
      - S3Bucket
      - WebsiteURL
    Description: URL for website hosted on S3
  S3BucketSecureURL:
    Value: !Join
      - ''
      - - 'https://'
        - !GetAtt
          - S3Bucket
          - DomainName
    Description: Name of S3 bucket to hold website content